
Welcome ThriveHub Pros!
We are so glad for the opportunity to work with you.
✅ Submit Your Application
If you haven’t already, complete the application so we have your information on file for upcoming opportunities.
✅ Log Into the Provider Interface
Use the same email you used in your application. Here you’ll find your Confirmed Sessions and Session Invitations.
✅ RSVP to Session Invitations ASAP
Confirm or decline right away so we can plan. You can respond by:
Replying to the message we sent or
Using the RSVP form
If you accept:
Also accept the Google Calendar invite
For a series, let us know any dates you’ll be away or will need a sub
✅ Review Session Details at Least 24 Hours Before Class
Check your Session Details early—last-minute questions may not receive a response. Information can be updated at any time, so always review the details beforehand to ensure everything is current.
✅ Arrive Early
Standard arrival is 15 minutes before class, though some sessions require more time; any additional arrival time will be noted.
This means being in the actual room — not just the building — fully set up and ready to greet students at least 15 minutes before the scheduled class start time.
Your class rate includes this required arrival/setup time. Late arrival or failure to be fully ready on time may result in prorated compensation adjustments.
✅ Start On-Time
Classes must begin on time. If anything may delay the start, call and text your ThriveHub and Day-Of Contacts immediately. Contact us if:
You can’t find or reach the Day-Of contact
You haven’t been directed to the room
The room is locked
Required equipment is missing
No students have arrived
Use your judgment to troubleshoot so class can begin on time.
✅ Post-Class: Always Use the Session Form to Send Attendance & Feedback
Submit attendance and feedback as soon as possible.
If your session details include additional steps (text ThriveHub, upload a sheet, etc.), please complete those as well.
Share feedback to help improve programming and client experience. Useful details include:
Any updates needed in the Session Details for next time
Whether the space was set up appropriately (lighting, temperature, furniture, etc.)
Whether signage was clear and students knew where to go
Whether the class was marketed to the community
✅ Request a Sub Early (if needed)
If you can’t teach, request a sub as early as possible.
Do not cancel within two weeks unless it’s an emergency.
If you’re getting sick or think you might need a sub, text or call (do not email) your ThriveHub Contact immediately so we can line up backup. When possible, please offer to source coverage from your own network.
Notify your ThriveHub Contact of any vacation or out-of-office dates at least two weeks in advance.
Frequent or last-minute sub requests may result in removal from the roster.
✅ Be Proactive With Questions and Needs
Report any client, student, or technology issues immediately.
Text or call for anything requiring a same-day or urgent response.
For anything that comes up within three hours of your session start time, call your ThriveHub Contact first. If there’s no answer, text as well.
If you cannot reach your ThriveHub Contact and a need comes up within 15 minutes of class start time, also call/text the Day-Of Client Contact.
Submit all non-urgent session-related questions through the Session Form — even before class (leave attendance blank).
Use the form to share updates (arrival notes, contacts, equipment available, etc.), or make requests (e.g. additional props).
Email us for general, non-Session questions (reply within ~24 business hours).
“Reply all” to emails and text threads so all parties are kept in the loop.
✅ Keep Your Profile Updated
Use the “Update Profile” button to let us know of changes to your schedule or Activities you teach.
✅ Get Paid
Rates are listed in each Session invitation and confirmation.
Payments are issued biweekly on Mondays.
Checks are mailed to the address in your ThriveHub Profile.
Direct deposit is not available at this time.
A W-9 and Certificate of Insurance are required before you begin teaching.
If you earn $600 or more in a calendar year, YogaHub will mail a 1099-MISC to the address on your W-9. If you earn less than $600, you will not receive a 1099-MISC.
Client Cancellations and Rescheduling:
Indoor classes: If canceled within 24 hours, you receive full payment.
Outdoor classes: Policies vary; check the Session Details to see the protocol for specific opportunities.
Start Here: Essential Guidelines
Session Protocol
No Students?
Double-check that you’re in the correct location.
Contact the Day-Of Client Contact to let them know no students have arrived and ask if they’d like to send a reminder.
If the Client Contact approves, you may leave.
You will still be paid for no-show classes.
“When do I begin?”:
At the scheduled start time, assess the room. If students are still arriving or missing, check with the Day-Of Client Contact to confirm when they’d like to begin.
If the client requests a late start:
Let them know if you have a hard stop at the scheduled end time, or
If you’re able to stay later, ask whether they’d prefer to run the full session duration.
Meet & Greet
Use the pre-class window to welcome students and build connection. Simple ways to engage:
Greet students by name
Briefly explain what to expect in today’s practice
Invite dialogue:
Ask how they’re doing
Invite questions
Offer simple tips or suggestions
Share a bit about your day and ask about theirs
Ask what they’d like to work on (poses, meditation, techniques, etc.)
Acknowledge relevant holidays or events
Invite students to share any information that may support their practice
Class Intro & End
Introduce yourself with your first and last name, and share a brief note about your wellness professional background.
Address the group using the Audience Name listed in the Session Details.
Introduce the class type and set expectations, including:
What students can expect in today’s session
The general agenda or focus
Any props they should have ready
Share any Announcements requested in the Session Details.
If any issues occurred (tech problems, student concerns, negative experiences, etc.), call and/or text your ThriveHub Contact immediately.
Onsite Classes
Arrive Early, Prepared, and in the Right Place
Be in the actual lesson location, fully set up and ready to greet students 15 minutes before class.
Allow at least 15 extra minutes for parking, building entry, finding the room, and setting up.
If you may be late, immediately call/text your ThriveHub and Client Contacts.
What to Bring
Government-issued ID (many locations require it for security).
Playlist and portable speaker (download music in advance; service may be spotty).
Setting Up Your Space
Check in with the Day-Of Contact listed in your Session Details and follow their setup instructions.
Confirm where the Day-Of Contact will be during class in case you need assistance.
Set up your speaker and pre-class playlist.
Ask the Onsite Contact before adjusting furniture, lighting, or temperature.
Most classes occur in non-traditional spaces with no props available, so be ready to teach a fully modifiable sequence.
Greet students, learn names, and check them in if required by the attendance system.
Guide Participants on where to set up and where to put belongings.
Weather Protocol:
Many clients remain open during holidays and poor weather. If travel is unsafe (parking ban, dangerous conditions), notify your ThriveHub Contact as early as possible.
Weather-related changes will be decided based on conditions and Client input. Sessions may be:
Cancelled
Moved to Zoom
Moved indoors
Monitoring Weather
Begin monitoring the forecast 24 hours before class using Weather.com (our standard for all teachers, clients, and admins).
If there is 50%+ chance of rain or extreme heat (over 85°F) or snow at any time before your class, text your ThriveHub Contact (and Day-Of Client Contact if listed in your Session Details) to confirm whether class will remain as planned or shift.
Indoor Classes with Outdoor Option
Some indoor classes have the option to move outdoors when weather allows (this will be noted in your Session Details).
If weather is ideal and you’d like to move class outside, meet in your original location and lead students outside at the Session start-time.
Tracking Attendance with Acuity
Reporting attendance helps us have the highest possible impact on the communities we serve! Here’s how to do with the Acuity app for onsite classes:
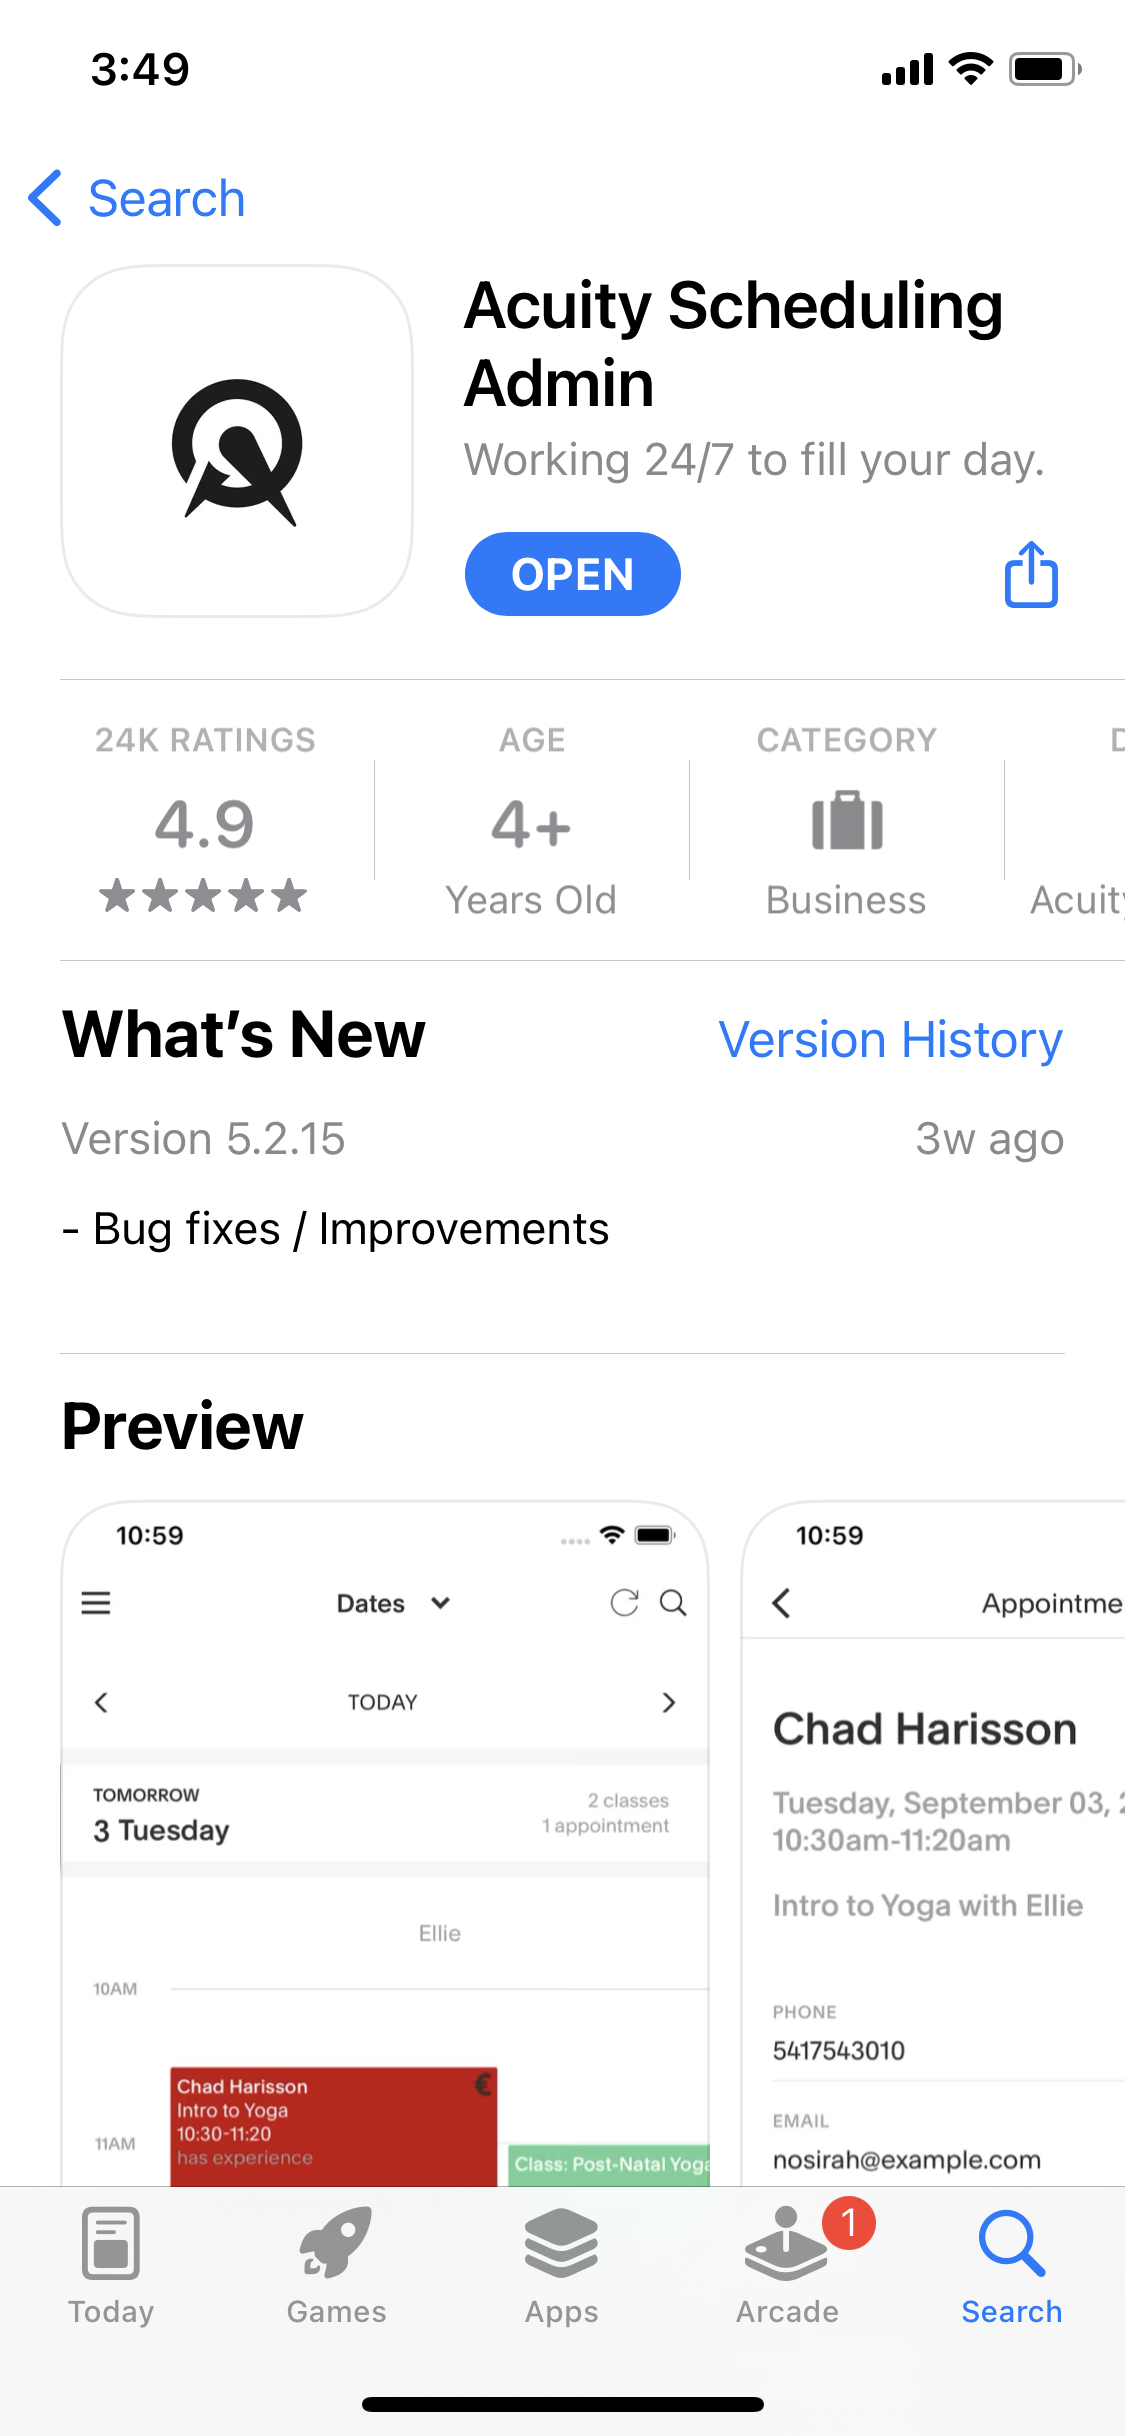
Download the Acuity Scheduling App
Open your App Store.
Search for “Acuity Scheduling.” Here are the links:
Download the App.
Login with the email you use to communicate with ThriveHub administration.
Use the password: Excellence1!
You’re welcome to change your password after your first login.
If you are unable to log in, please reach out to your ThriveHub Contact to let them know.
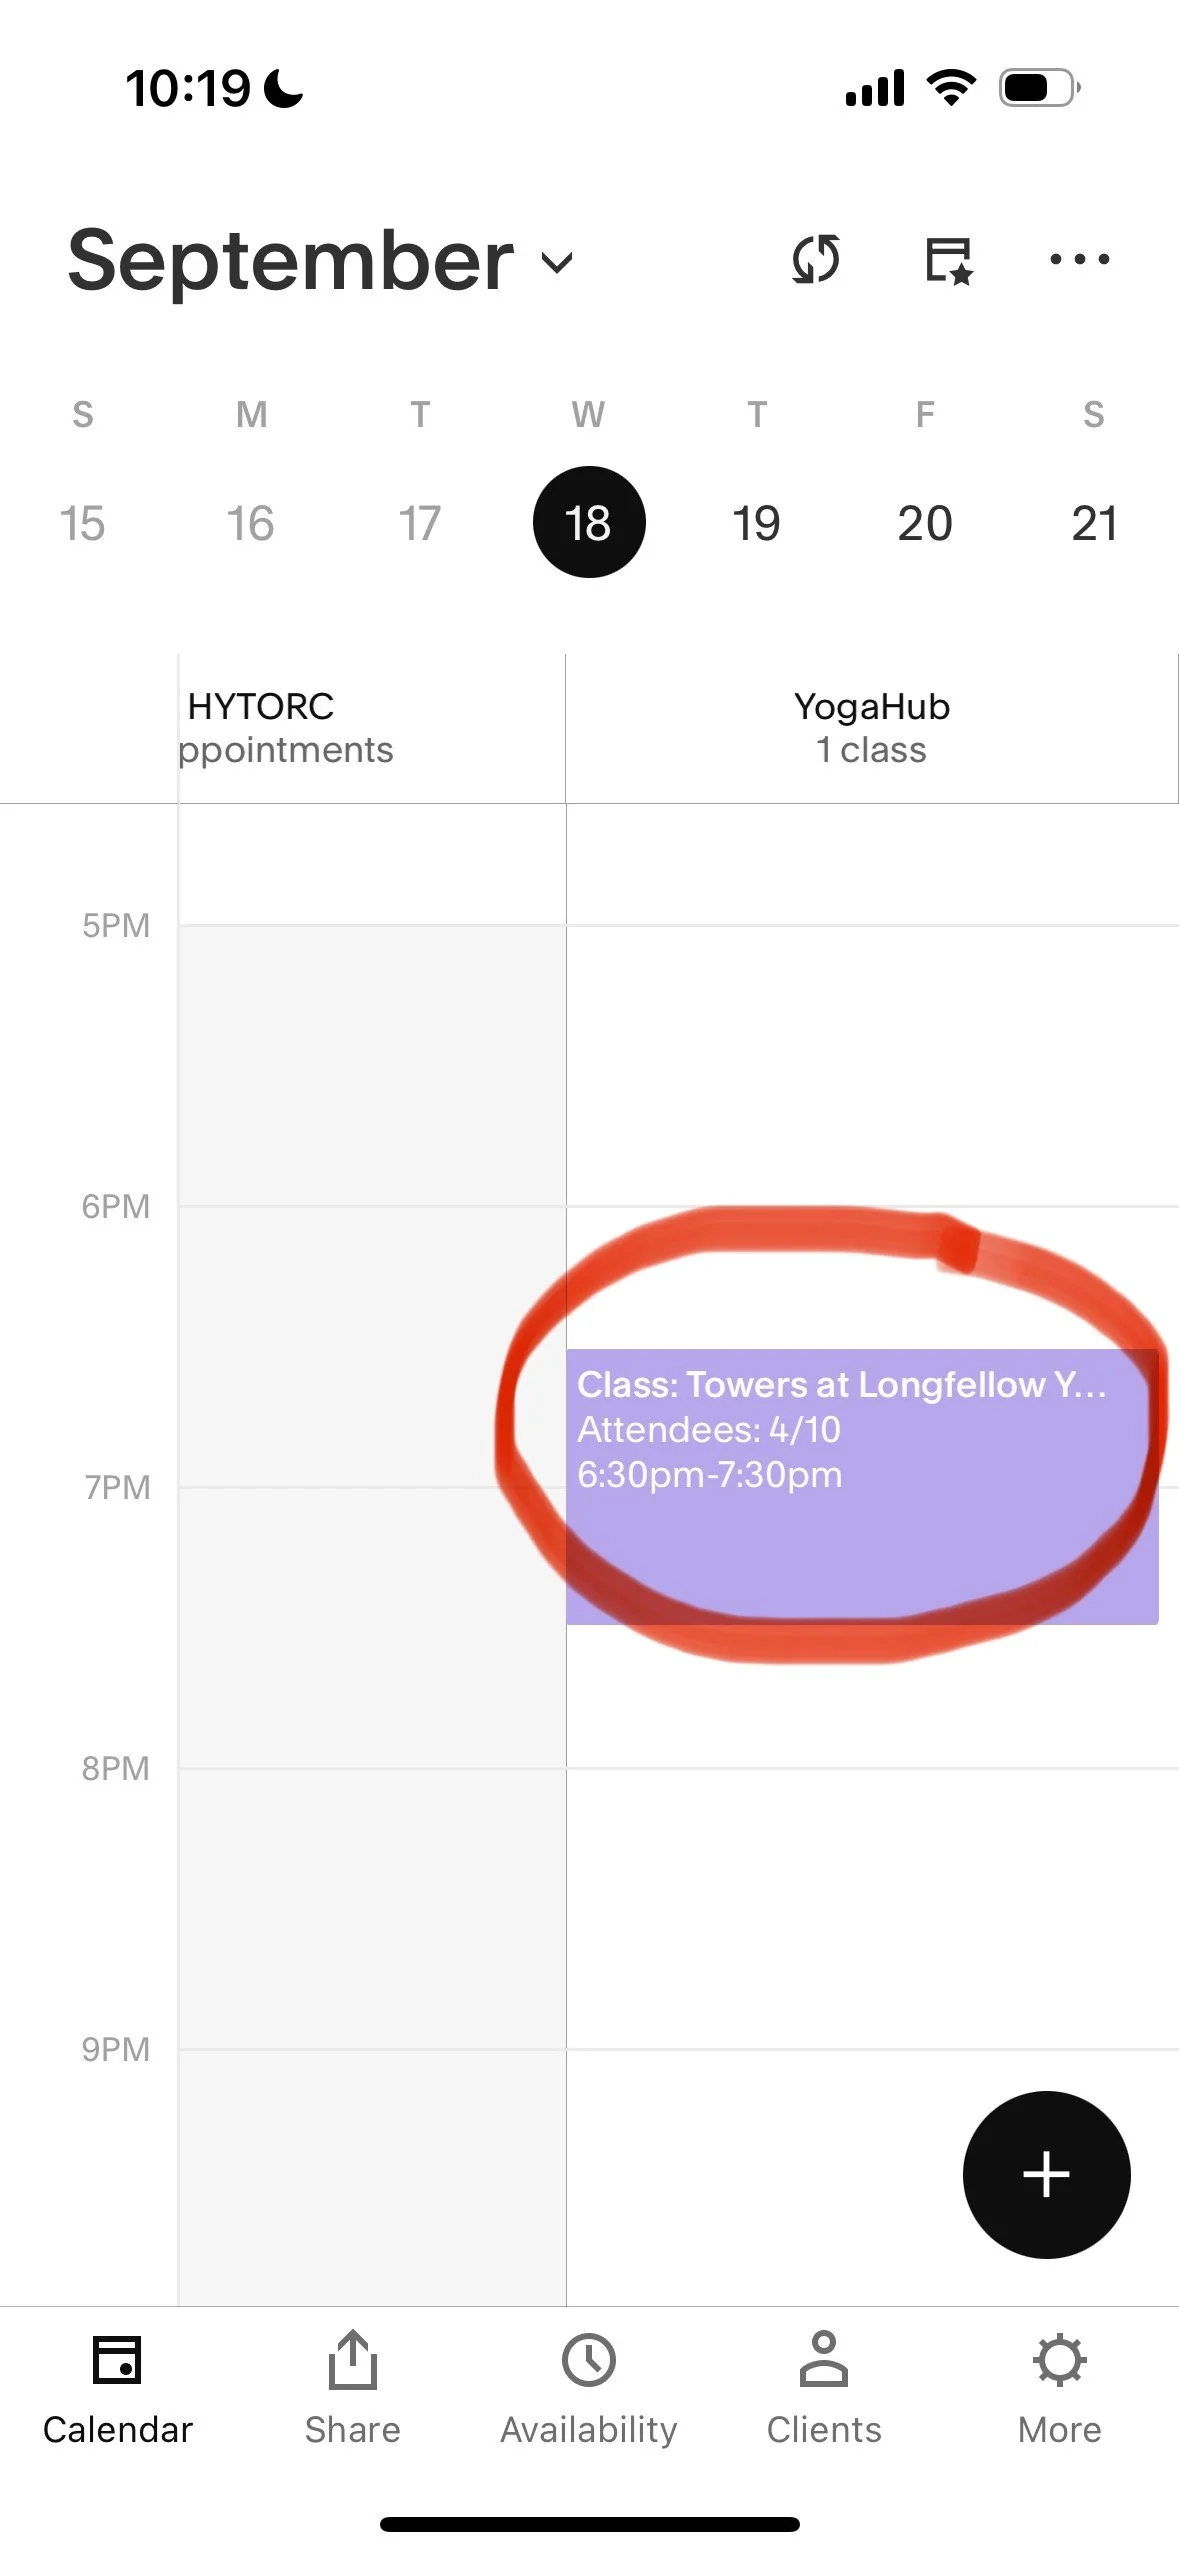
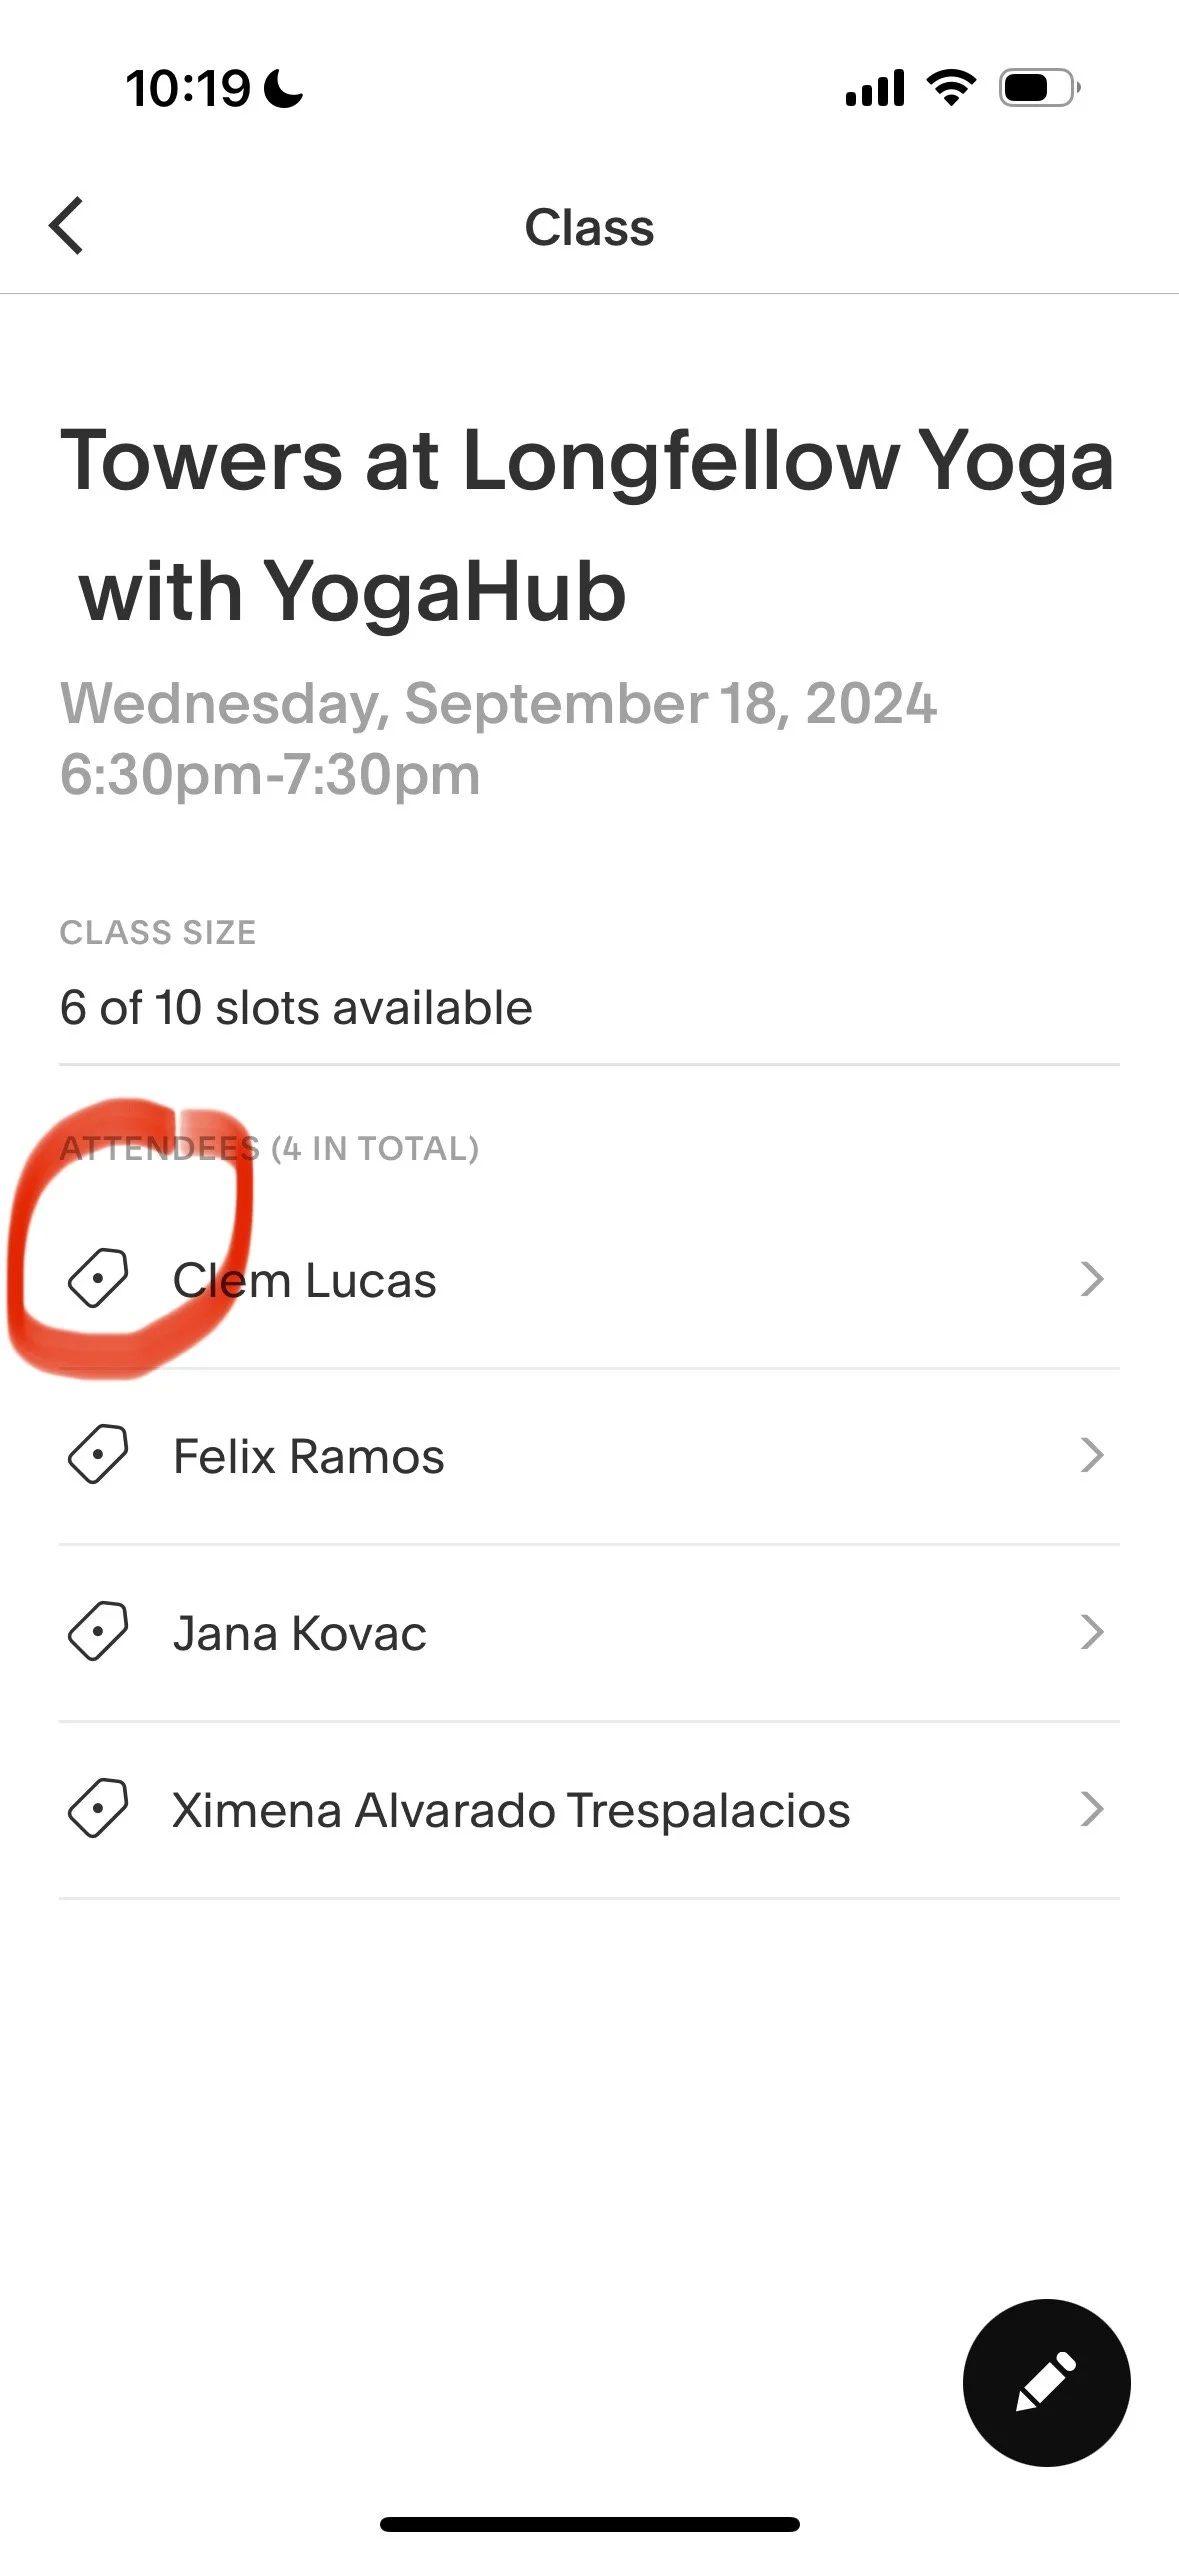
2. When setting up and waiting for students to arrive:
Open the Acuity app and log in.
Scroll to today's date.
Click on the class that you’re teaching. ("CLIENT NAME")
Click on a student’s name and scroll down to read their aims for practice.
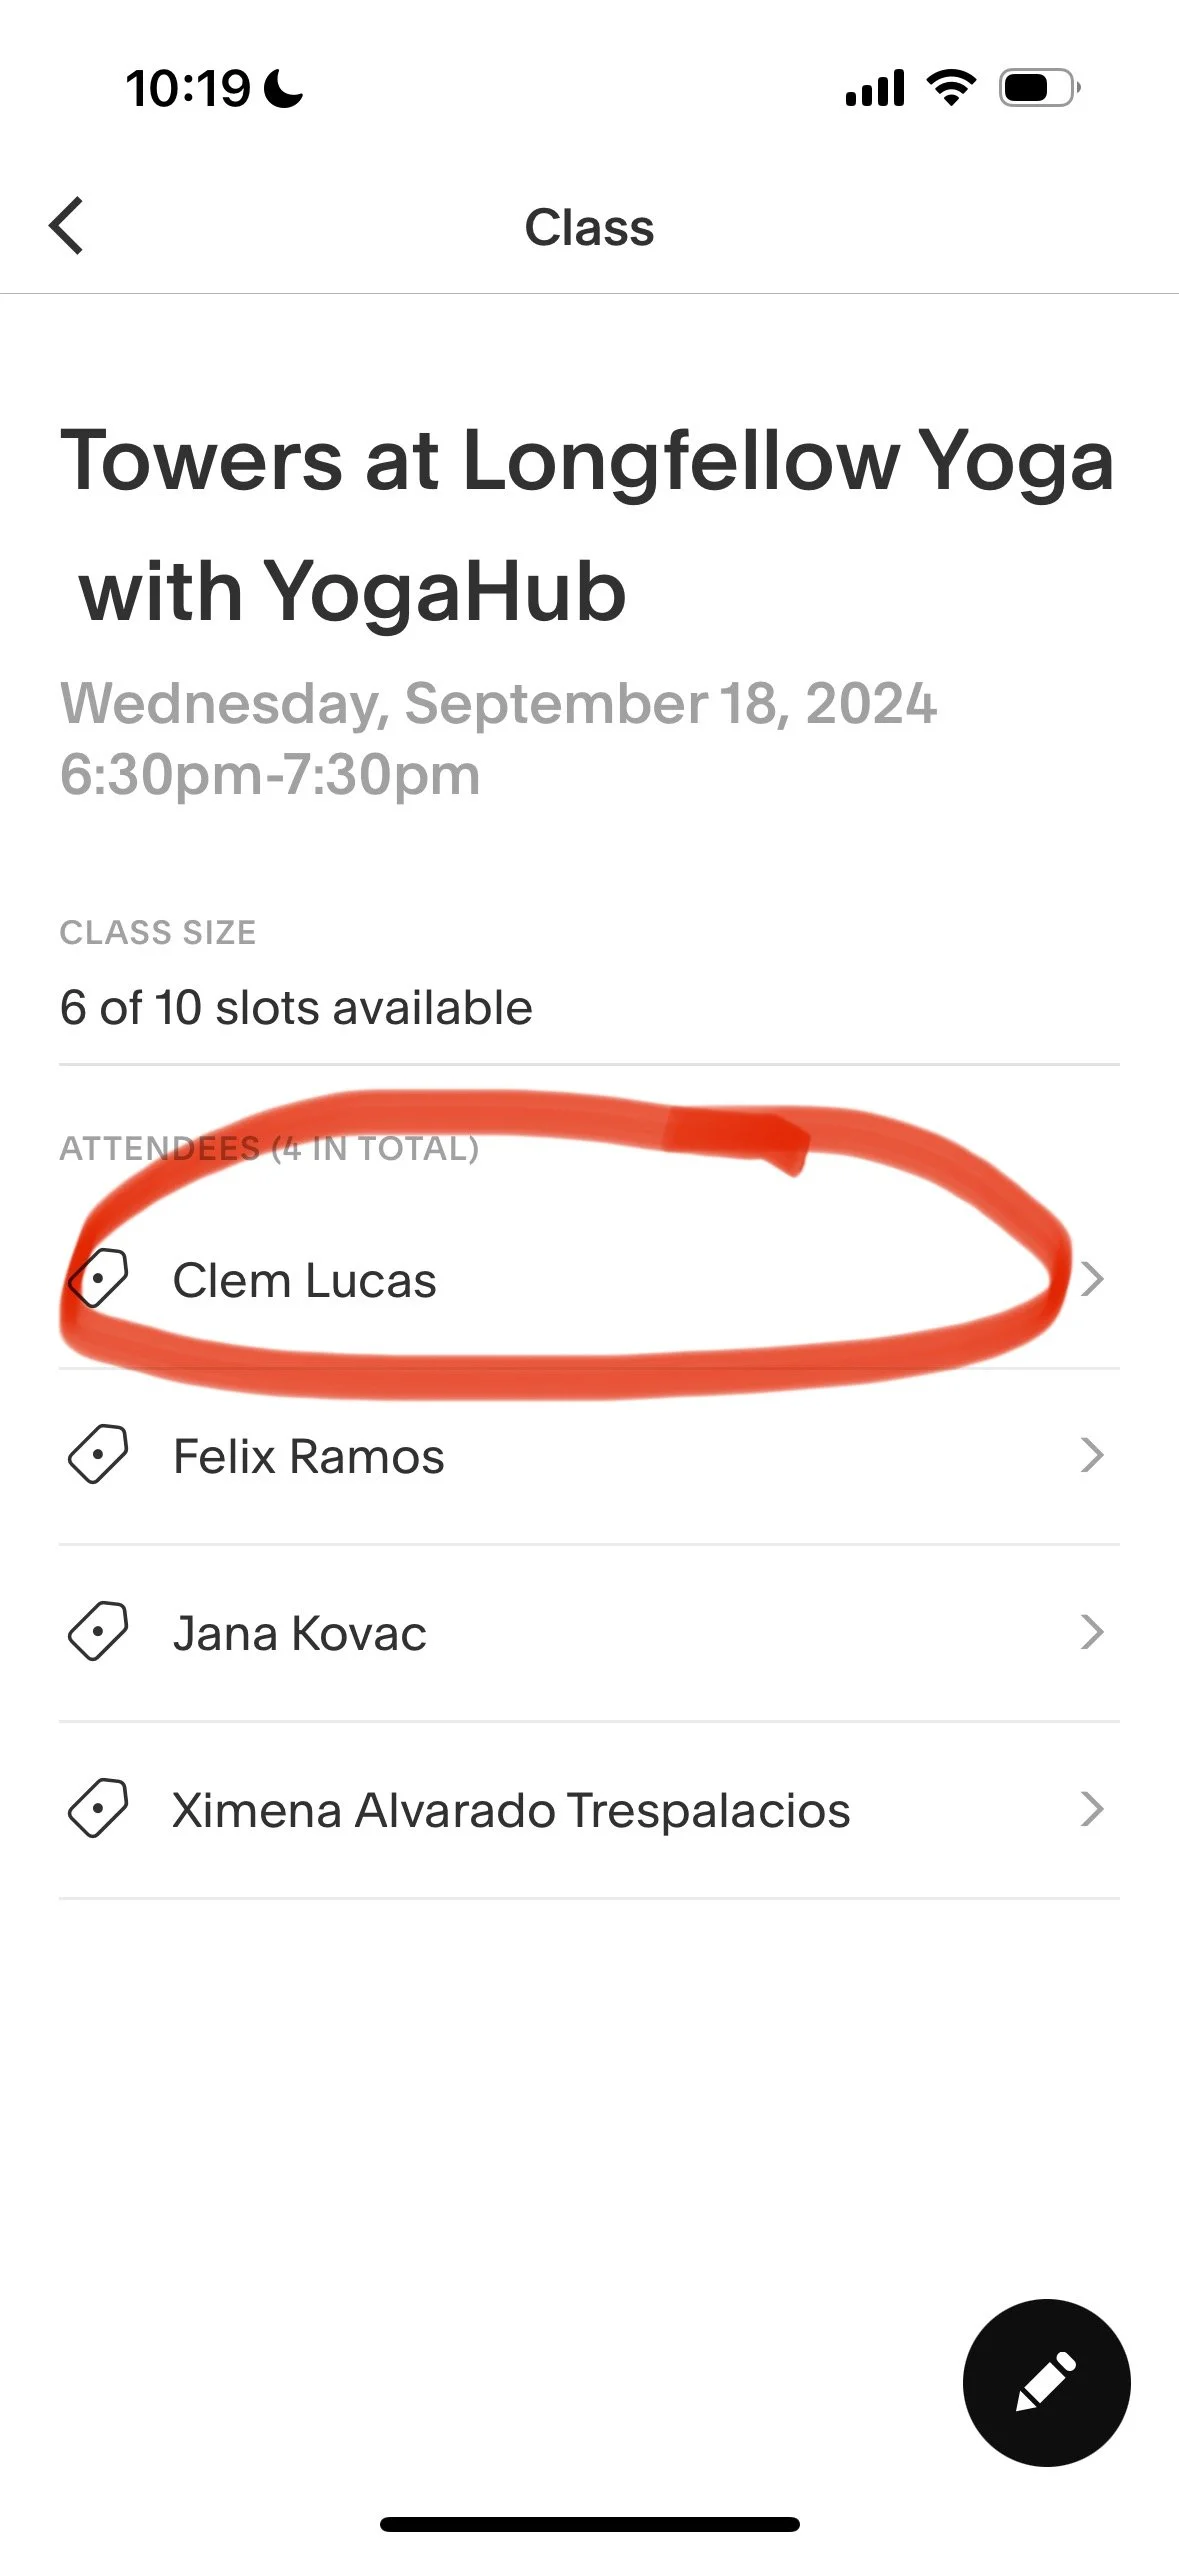

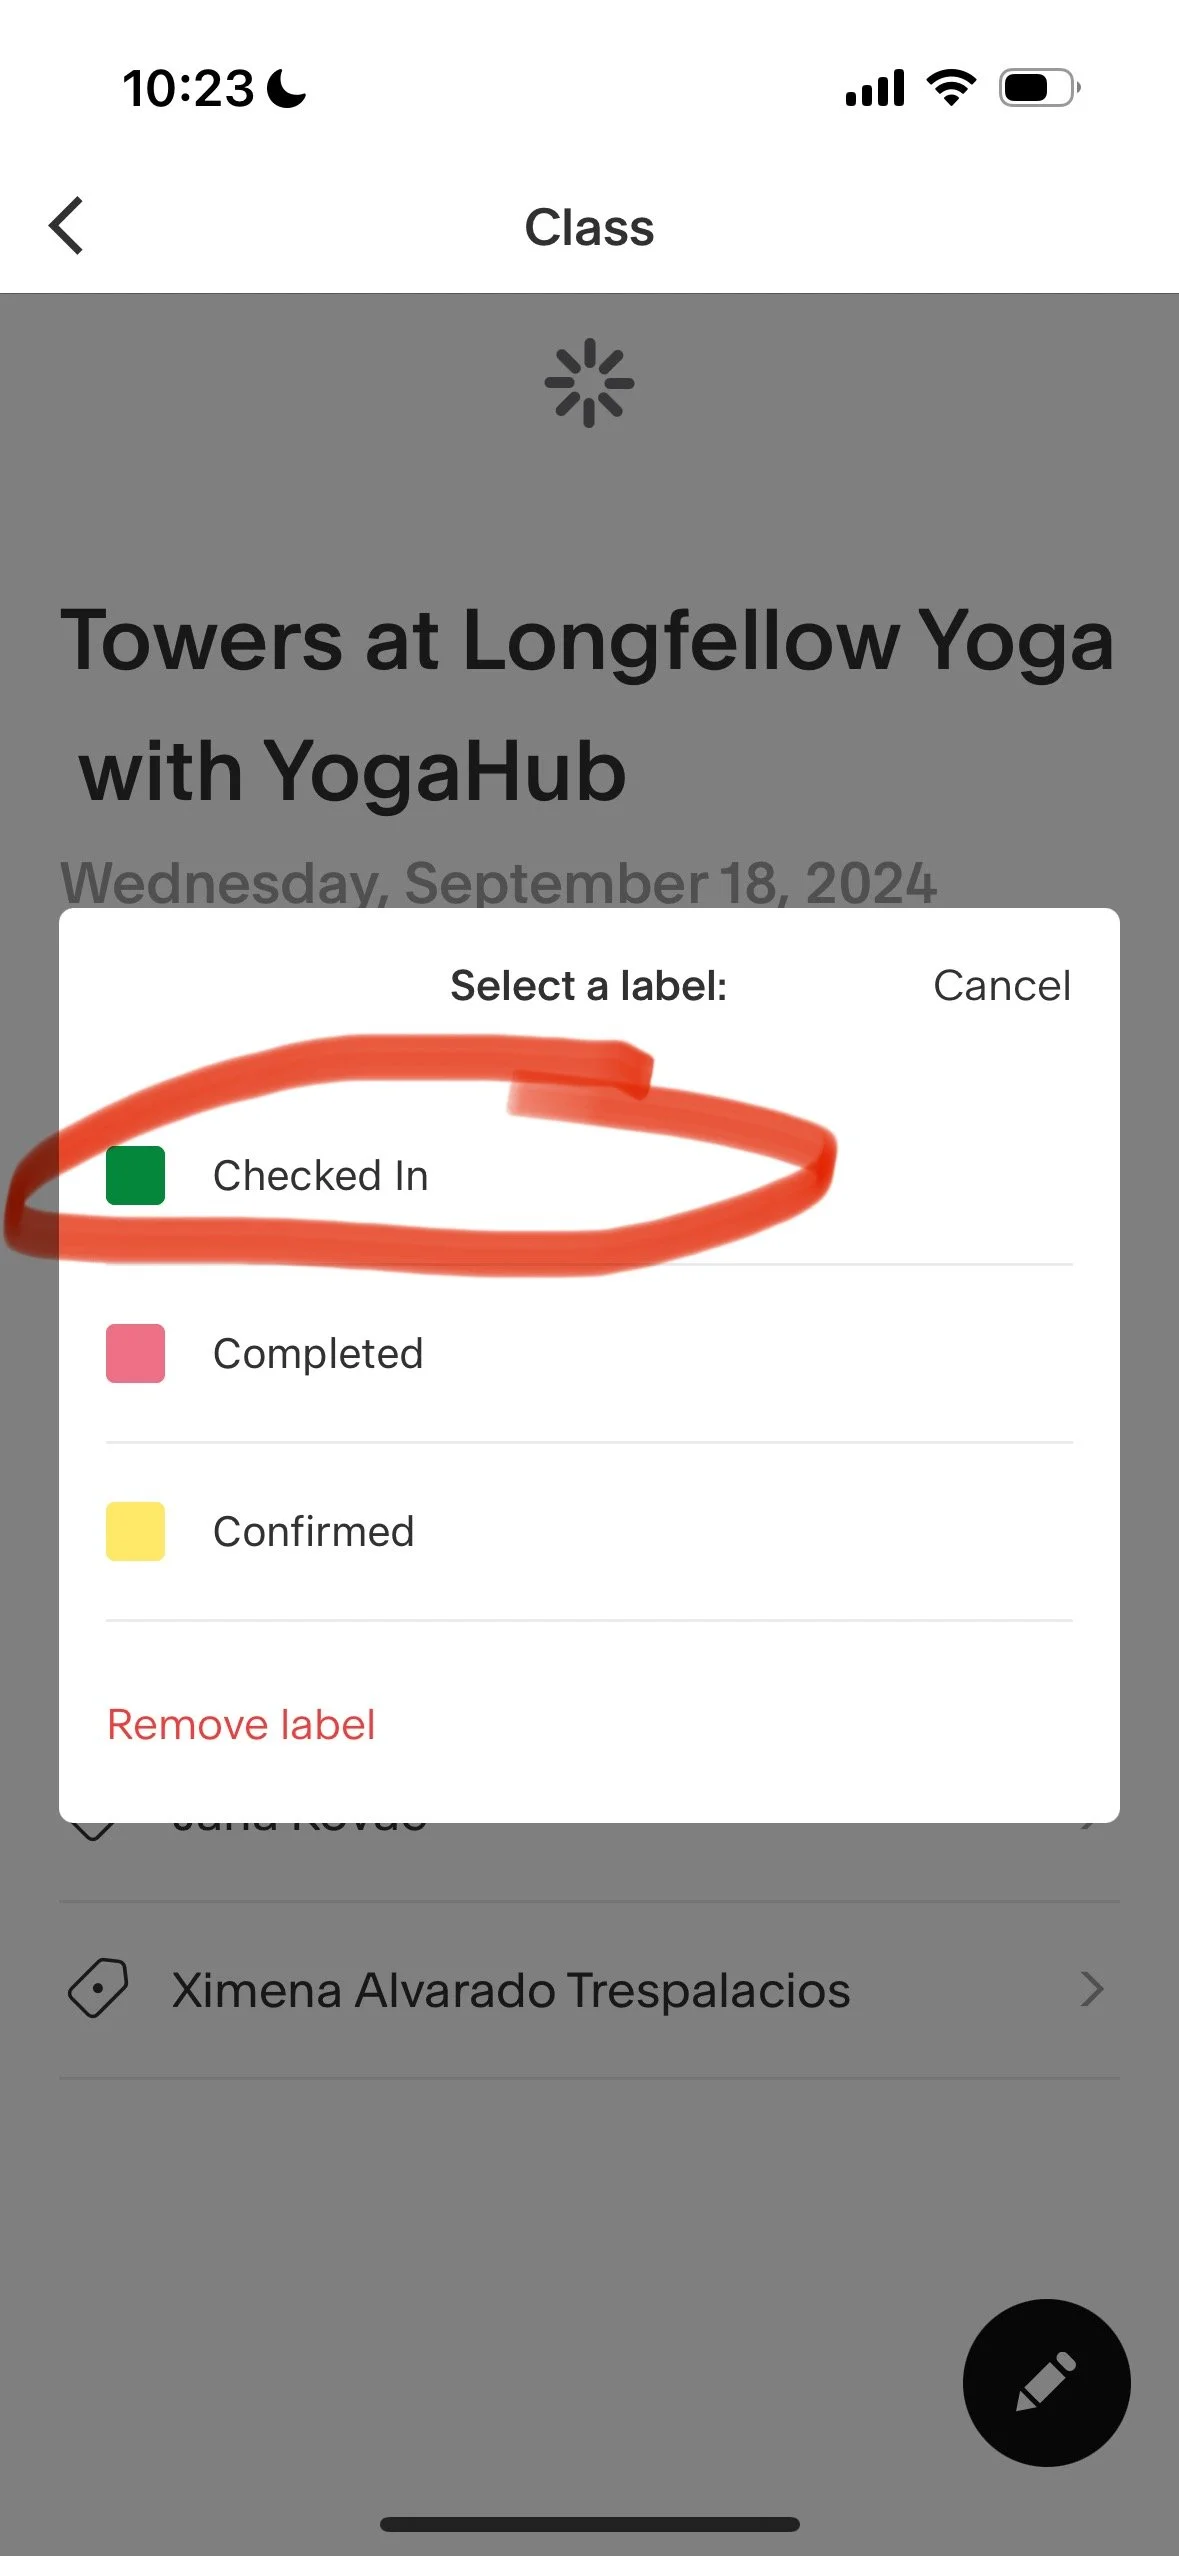
3. As students arrive:
Click the tag button next to the students’ name
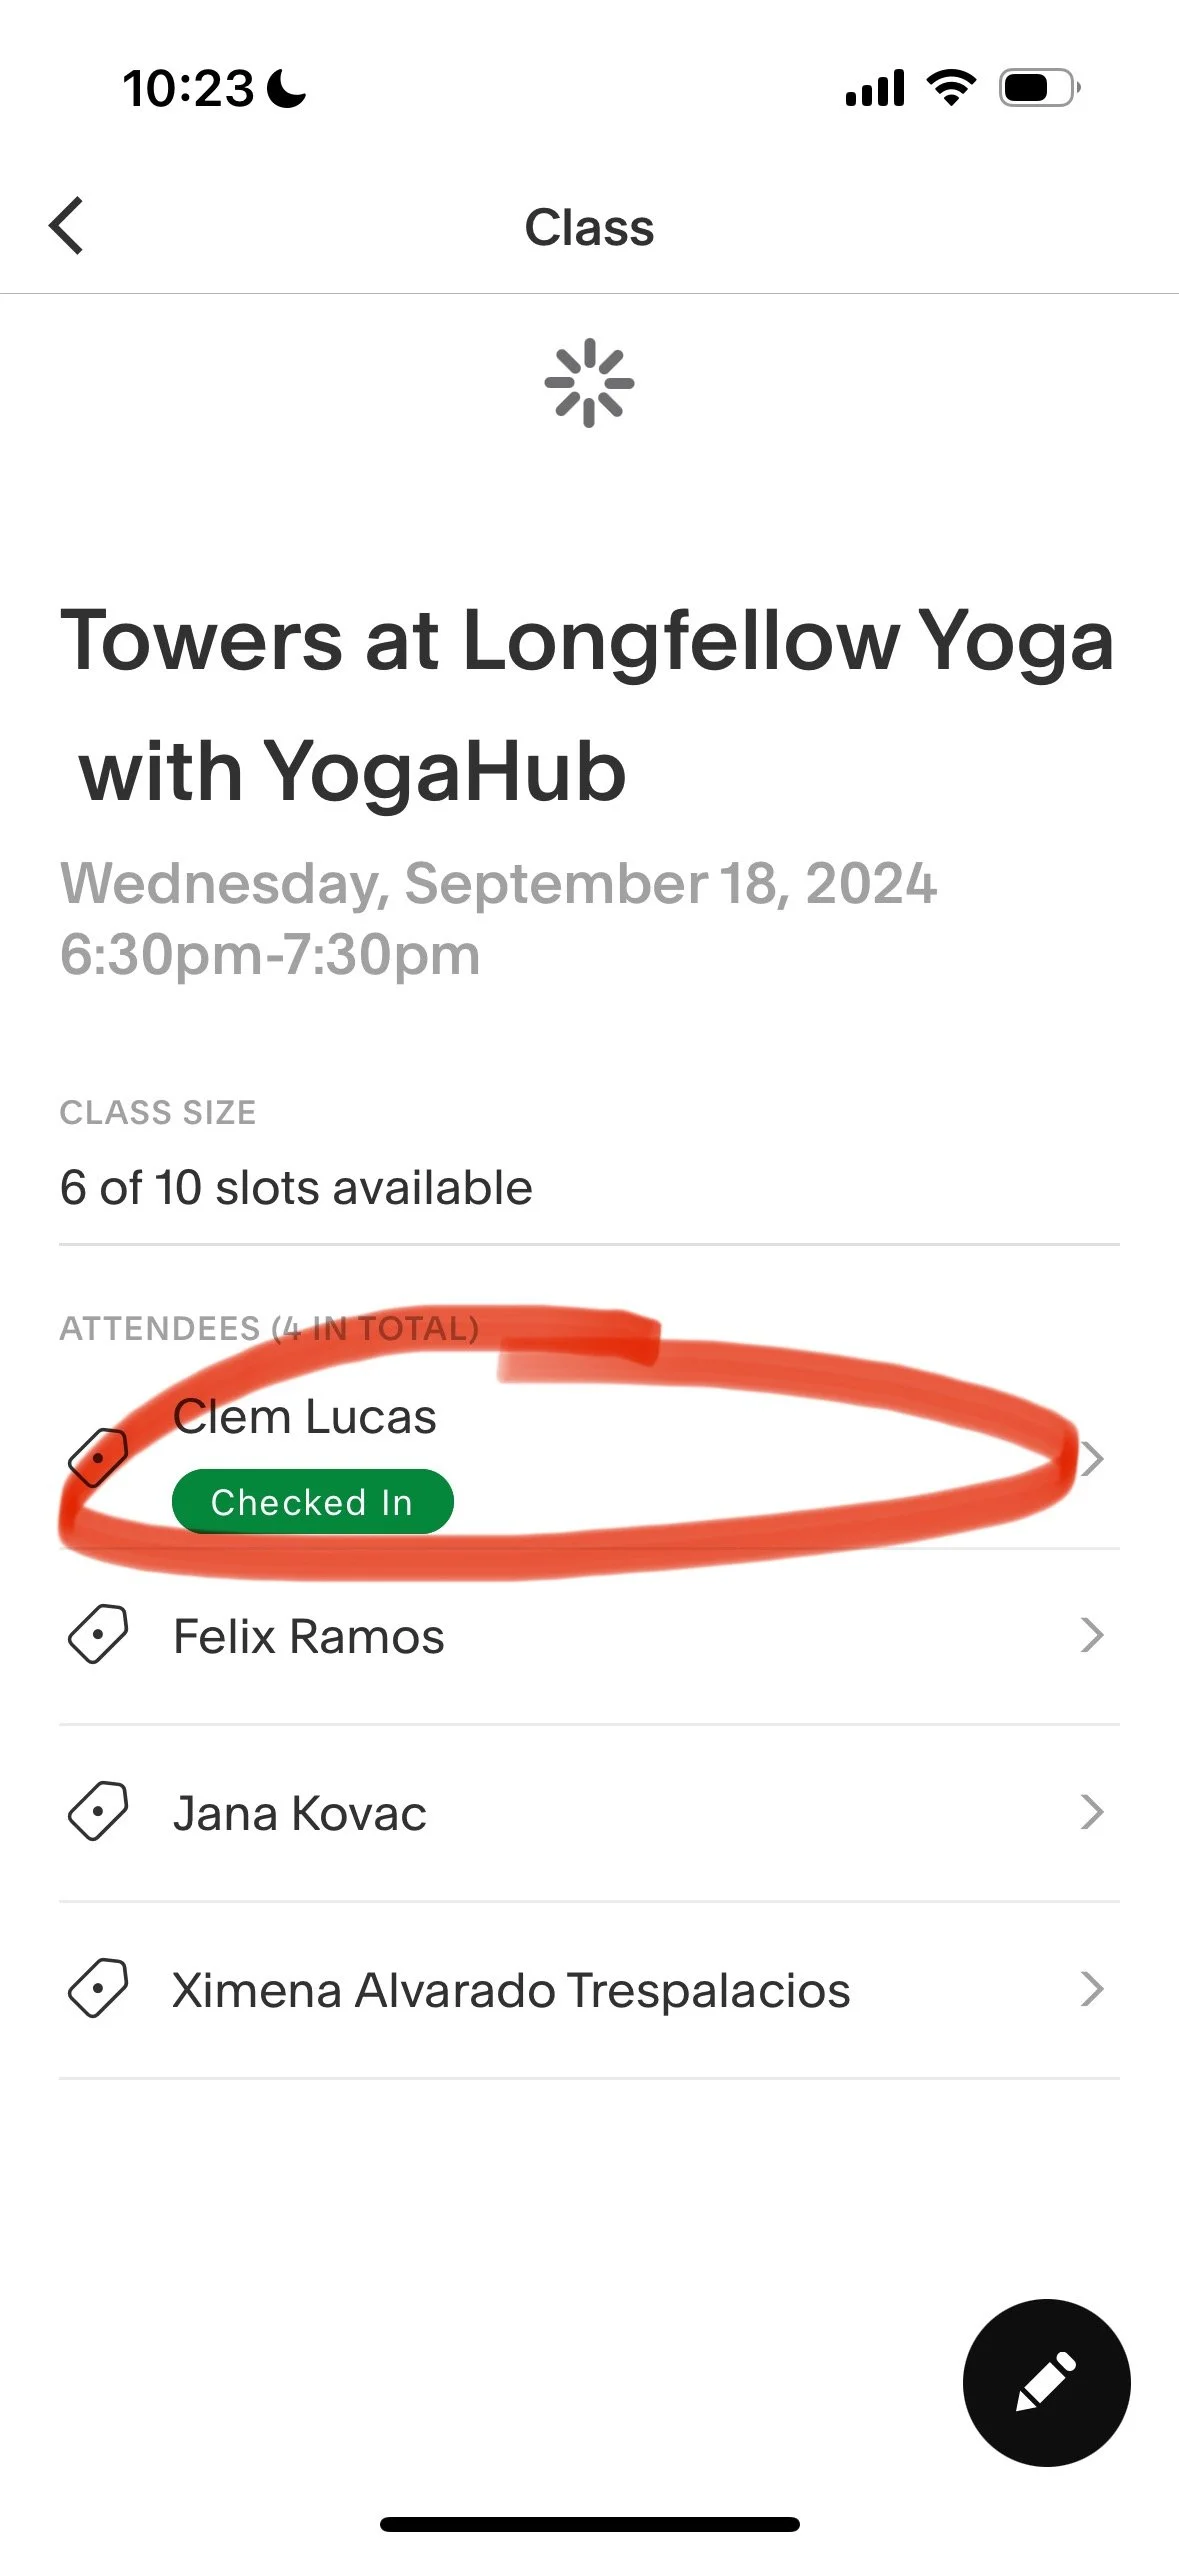
Click “checked in”
You should see the green tag under the name of each student who you've checked in for class.
Students who signed up but do not show up for class should be left blank.
You may do this within 15 minutes after class if you are running out of time beforehand.
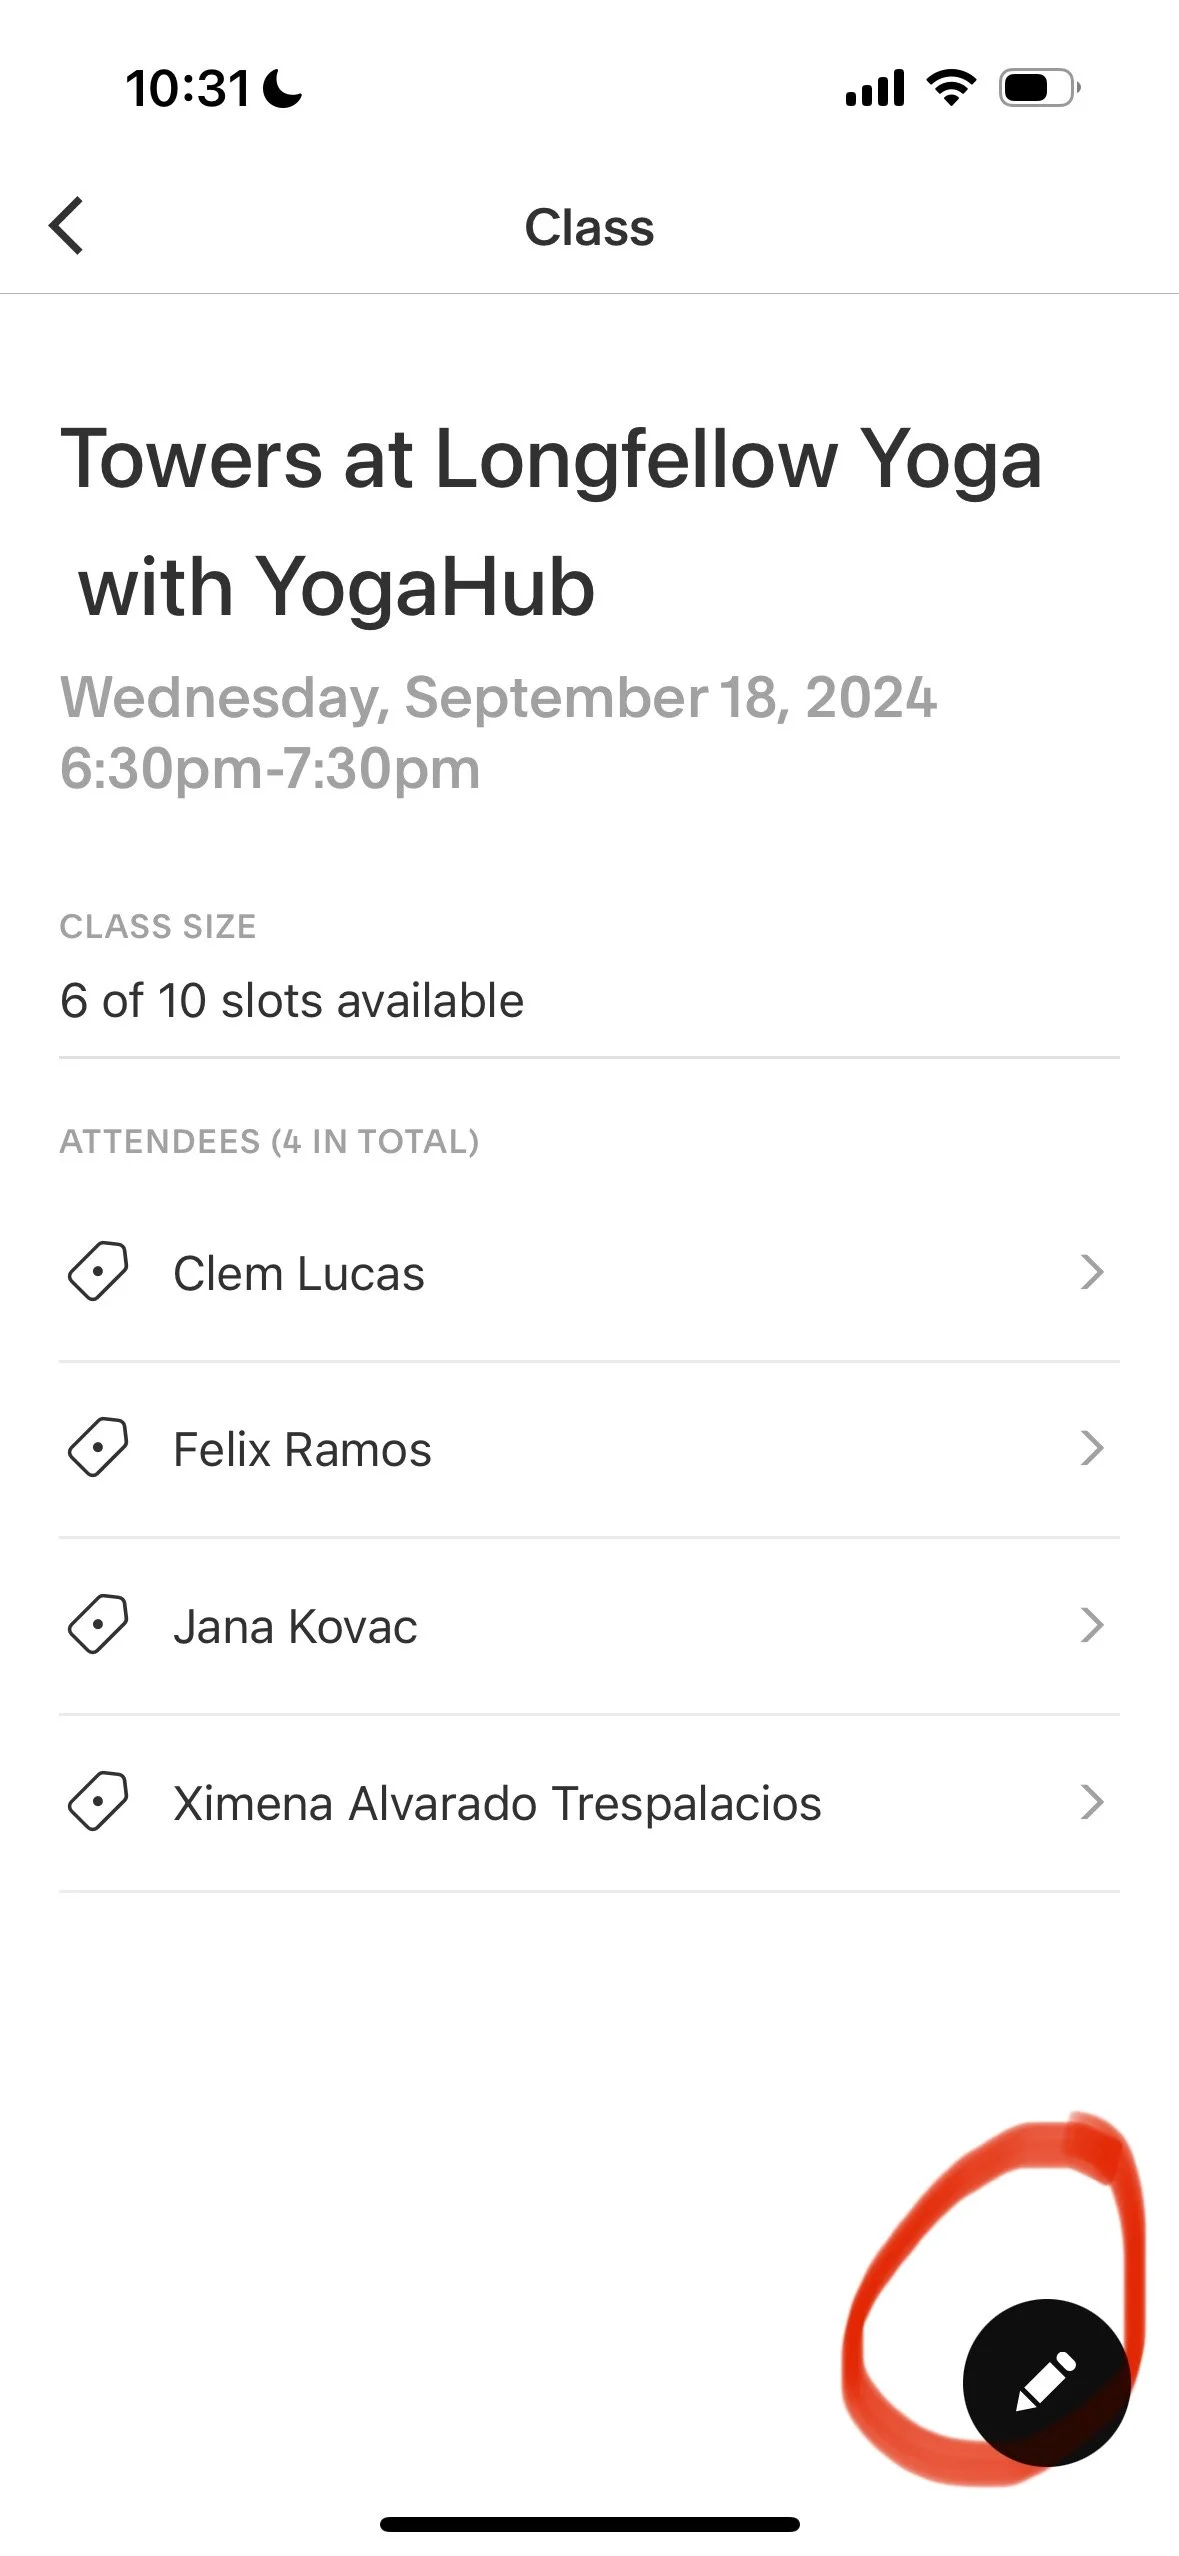
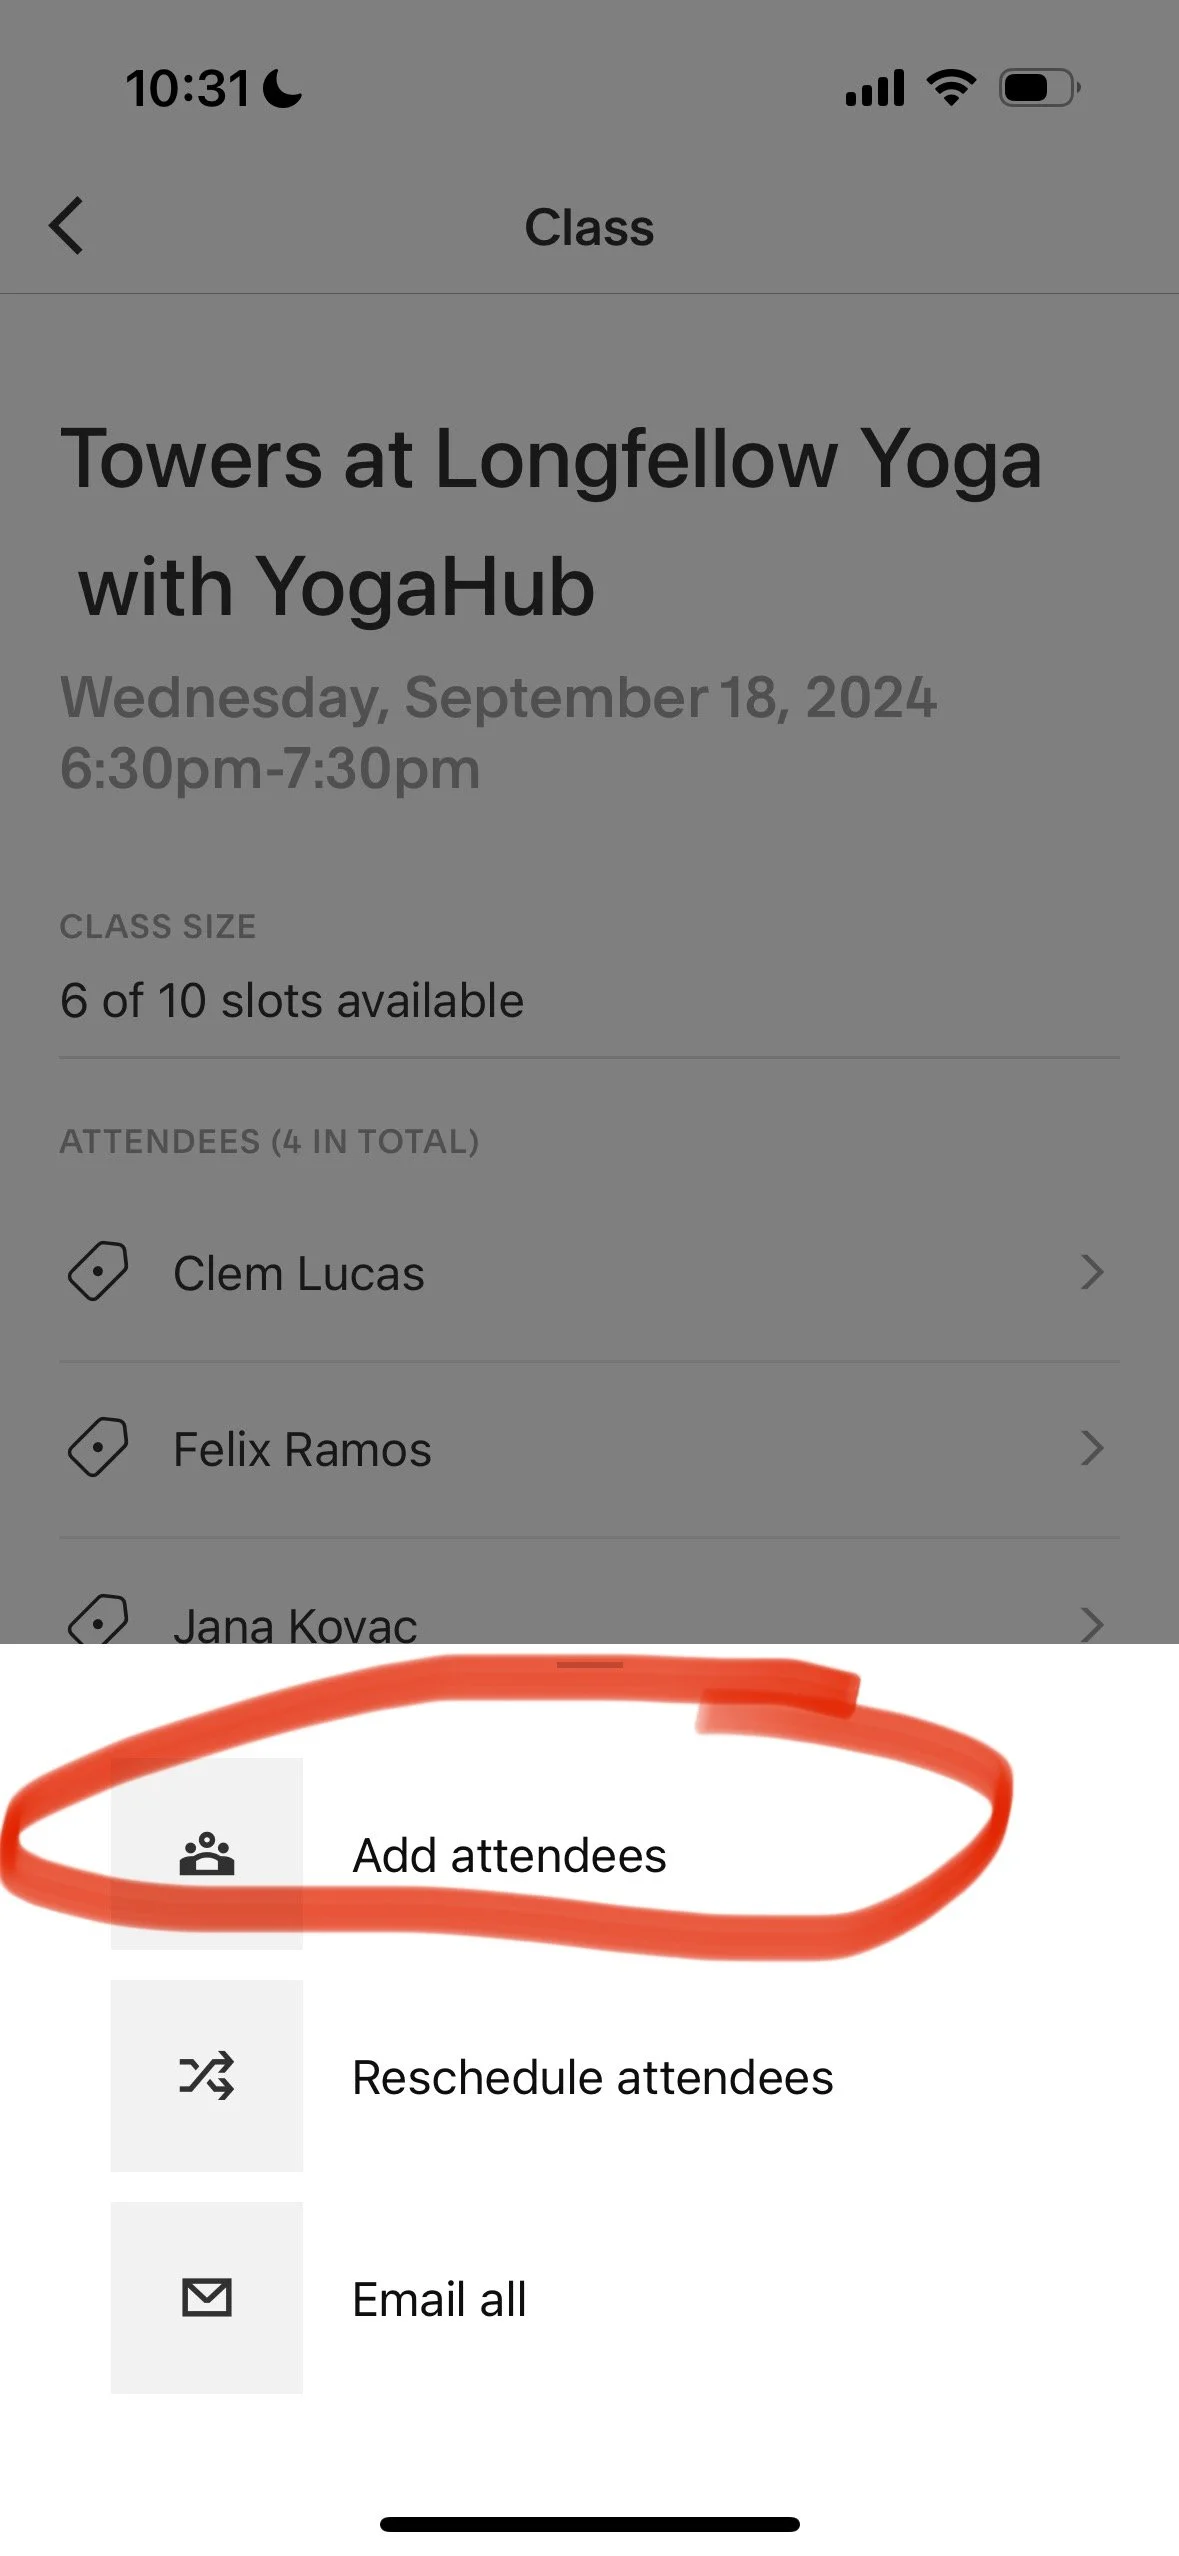
4. If students arrive who have not signed up in advance, add them to the roster:
Click the pencil icon in the bottom right corner.
Click "add attendee".
Start typing their name or email.
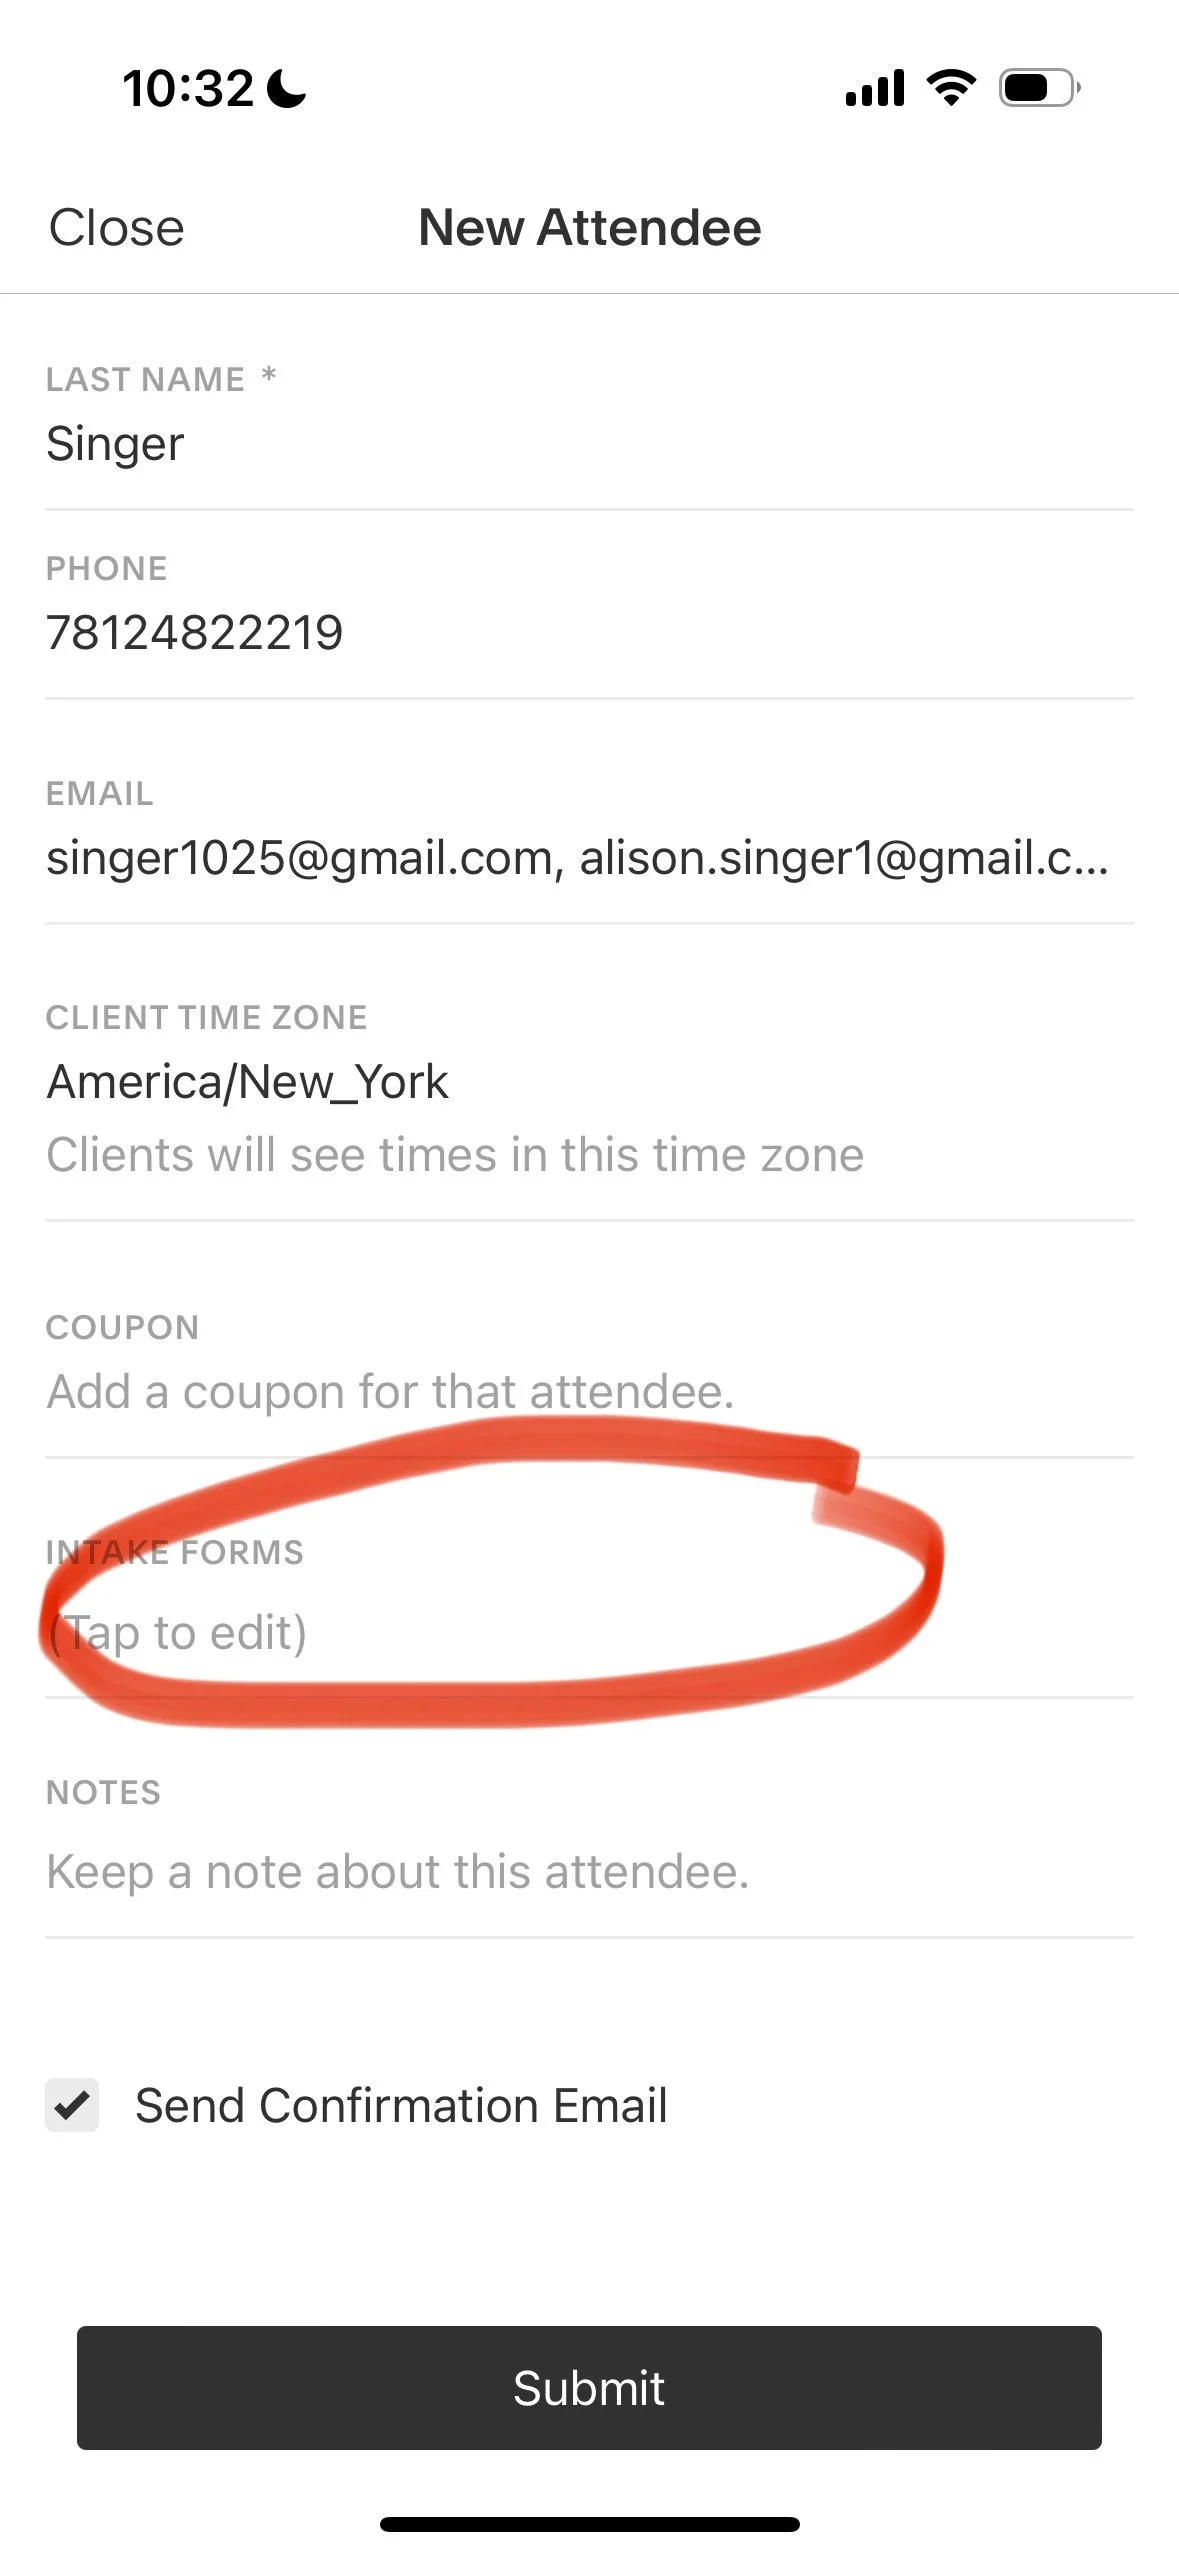
If they have signed up with ThriveHub before, the fields will automatically populate, and you may click their name.
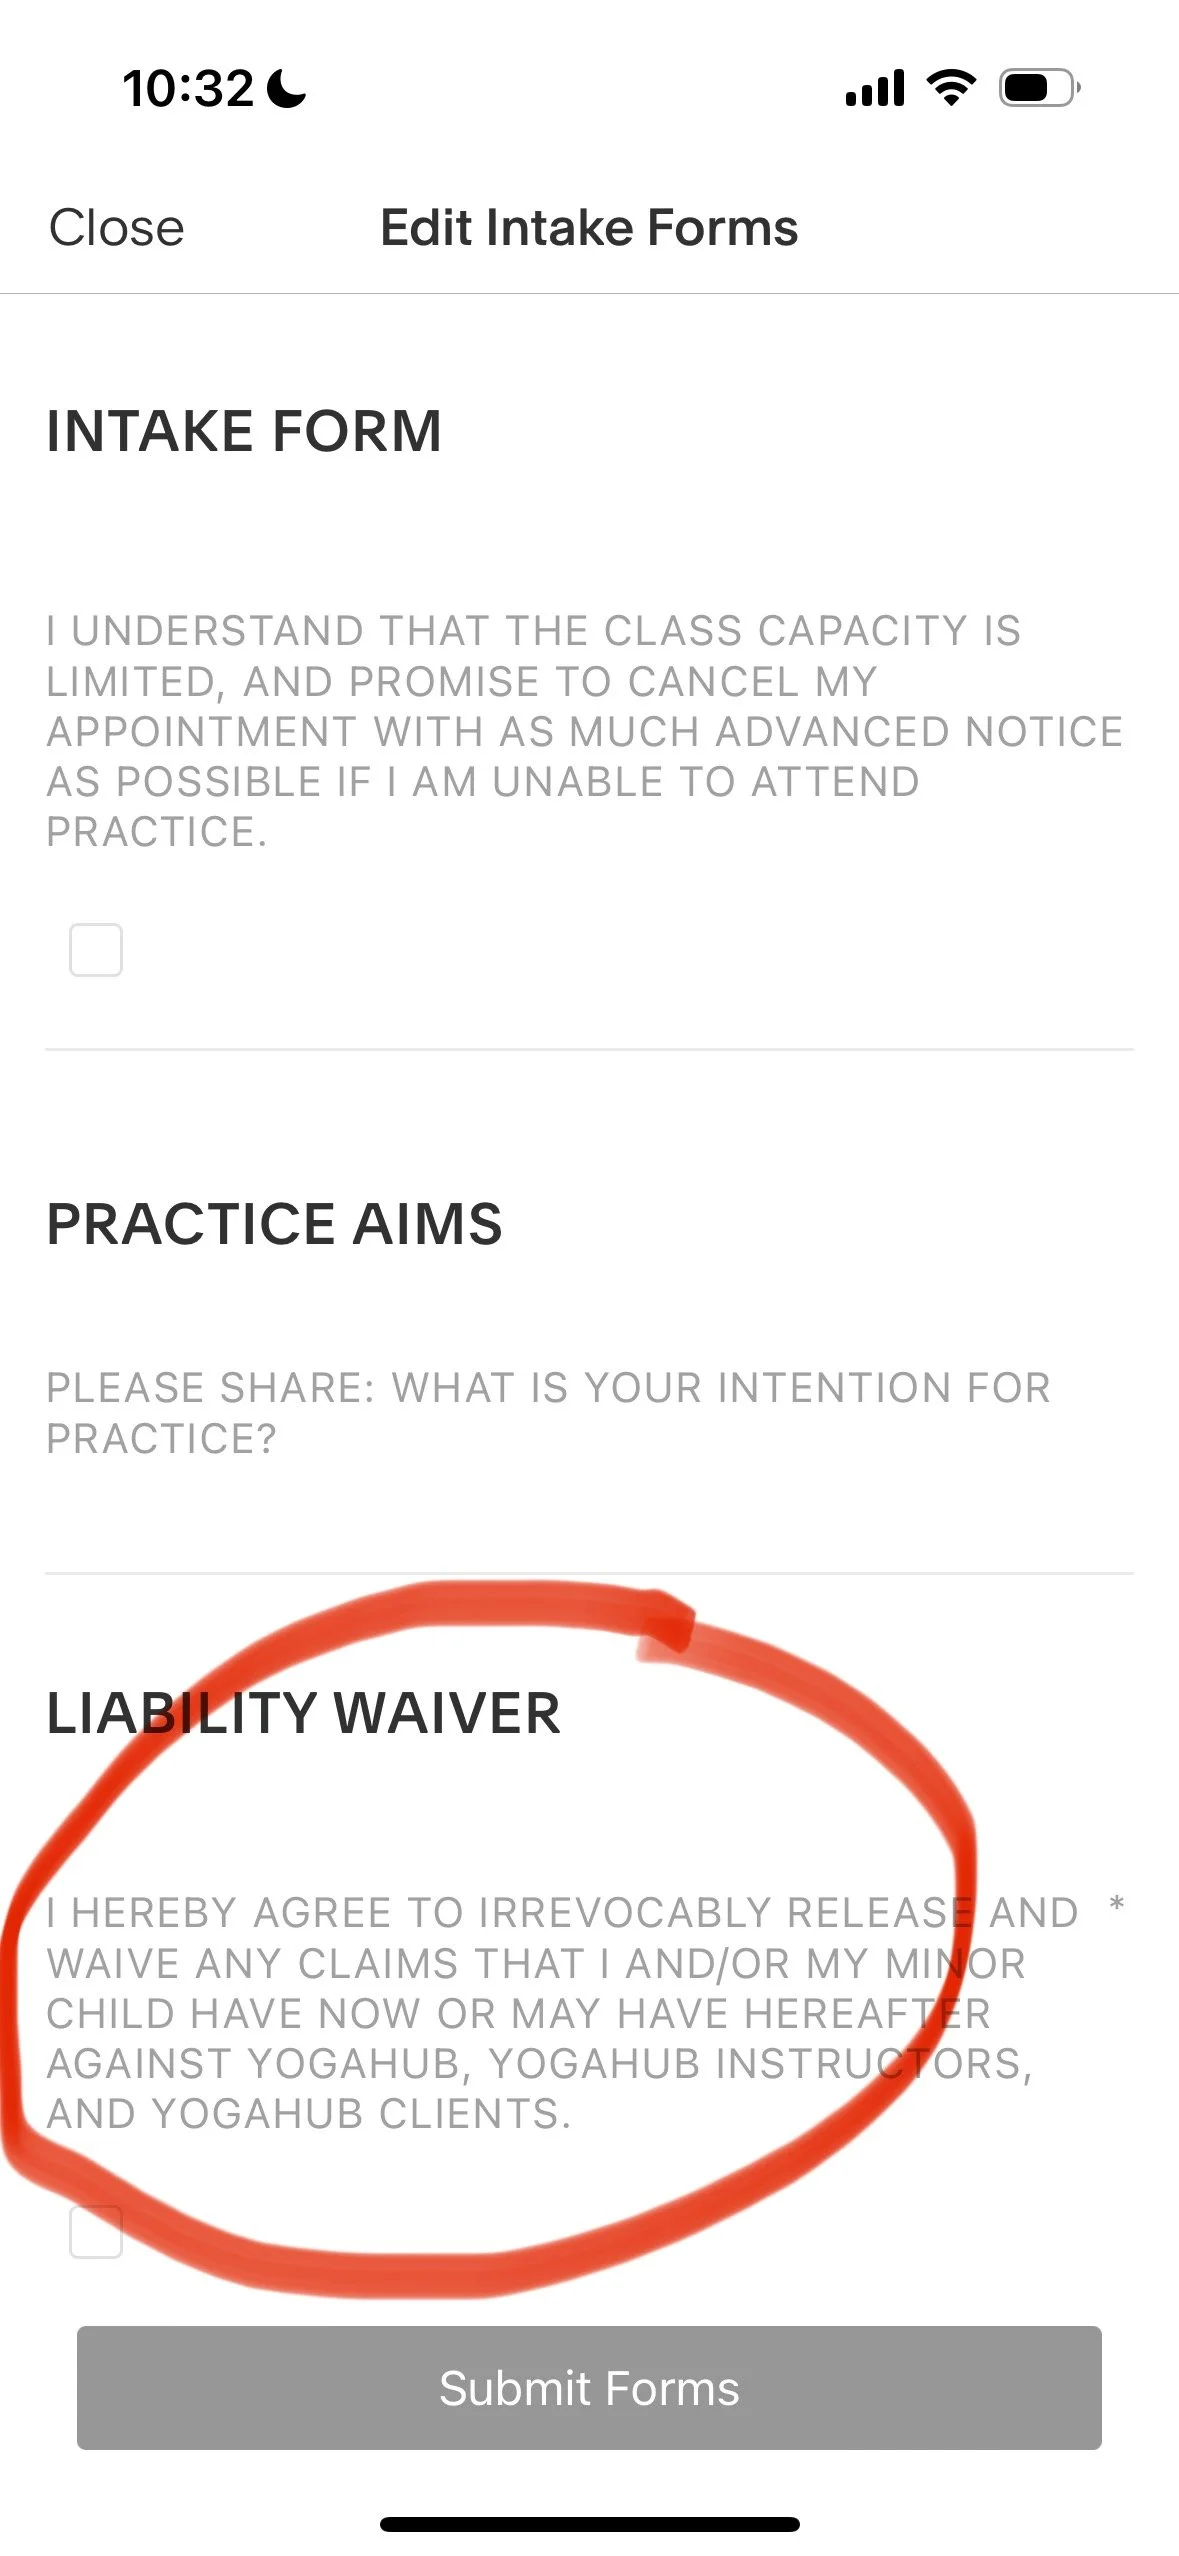
If they have not signed up for class before, type in their full name, email, and ask for their permission to check off the liability waiver.
Ask them about their Practice Aims and summarize their response in the form field.
Once the drop-in student is on the roster, apply the "checked in" tag so the green box shows under their name.
Troubleshooting:
If the app is malfunctioning please count the number of students in class and report to your ThriveHub Contact after class.
Virtual Studio Setup
Please do the best you can with the resources you have available.
We understand that not every teacher has the capacity to fulfill these Virtual Studio preferences in entirety. The guide below is a reference on what our high-end clients look for, and what we’d like to see in an ideal setting.
Equipment
*IMPORTANT!: Your iPhone camera app will not record the audio from your airpods. For best-quality sound, you must use a different microphone or camera app.
Quality bluetooth microphone (or headphones, like airpods*) that connects directly to your camera app.
For headphones, choose a headset option that will stay put and not have you fidgeting to keep it in place.
Camera with 1080p or higher
Background
A light, solid-colored empty wall, with just a few plants or decorative items on the outside of the frame is best.
Minimize clutter as much as possible.
Remove from the frame:
All furniture
Personal photographs
Objects aside from yoga decor
If you have plants, please only have live, healthy plants
Lighting
Have as much natural light as possible
Position yourself so that the most lighting comes from behind the camera. Set up a diffused light on yourself if necessary.
Turn on any additional lighting that you have.
Ensure that there’s no glare or shadows.
Avoid light from windows that are facing the camera (windows in the background behind you)
Avoid any kind of fluorescent lighting (LED lights etc.)
If you have the option to set your lighting color, white light is best.
Positioning
Mat placement should:
Be centered in the frame.
Have the long side of the mat parallel to the camera
Have extra space on all sides of the mat in case poses go off of the mat.
Device placement should be:
Elevated off the floor.
On a steady surface that will not shake.
Upright and not tilted vertically or horizontally.
In landscape mode (for phones, turn the device horizontally and not vertically)
Use the camera on the back, not selfie mode.
Test Your Virtual Class Studio
Test in your camera as well as in the Zoom app, as the frame sometimes fits differently.
Connect your microphone and speak in the normal volume of your voice
Move about your space to ensure the frame fits the your entire body:
On each corner of your mat with arms out
Arms up overhead
Standing and laying down 1-2 feet in front of your mat
Review Your Test Recording
Ensure there’s enough space to frame:
Your whole body with arms reaching up and out to the sides
1-2 feet of the floor on the camera side of your mat
Make sure your external microphone pairs well with your video recording device (i.e. the speed matches, there’s good quality, and the camera actually records the audio from your microphone, rather than the built-in phone microphone).
Ensure there’s no echo (ideas for reducing echo).
Teaching Live Virtual Classes
Please use the same space sample that you had submitted to ThriveHub in your application. If you you will be teaching from a different space/setup, please let us know before accepting the opportunity (or provide two-weeks advance notice for ongoing classes).
Dual-Device Recommendation for Live Classes
To optimize the student experience, we recommend that you film yourself with your phone and view students from your laptop, set up in front of your mat. To set this up:
Sign in to the meeting as host from your laptop
Connect your microphone
Go into Zoom Settings
Audio: set output to your microphone, and input to your computer or headphones
Camera: Select “enable HD”
Join the meeting as a guest from your phone.
Do not join audio from your phone
Frame your mat setup with your phone’s camera
If you are playing music, play it from your laptop, and always play through the Zoom app, rather than a speaker in your room:
Start your playlist from your music platform (Spotify, YouTube Music, etc.)
In Zoom, click Share Screen > Advanced > Share Audio Only
Spotlight your laptop camera/screen to greet students up close at the beginning and end.
Once you begin teaching, Spotlight your phone’s camera view.
Step-by-Step Virtual Setup
Teaching on ThriveHub’s Zoom Account
Unless otherwise noted in the Session Details, you must sign in to ThriveHub’s Zoom Account. This enables you to have host controls (mute participants, spotlight your video, play music, etc.).
Please be sure to only log on within 15 minutes of your scheduled class time (before and after), in order to prevent disruptions to other classes.
3+ hours Before Class
Complete any required system or application updates in advance of the session
For clients who are not hosting on Zoom, review the meeting platform requirements and familiarize yourself with the technology (recommended one-day before)
Ensure your camera and bluetooth headphones have enough battery power and memory to capture the entire session.
Choose a quiet environment to film in.
Ensure any electronics, or other sound-producing devices (air conditioners, televisions, space heaters, dishwashers, fans, etc.) will be turned off.
Notify any co-habitants to keep quiet and leave you undisturbed.
30-60 Minutes Before Class
Set up your at-home studio:
Remove clutter; organize props and decor
Remove anything that might be a distraction for yourself
If recording on your computer or another device, have your phone off camera and out of sight.
Set up your fur or actual babies in another room
Please have your water handy to minimize the time you leave your mat.
Please set up a clock behind your camera so that you may discreetly check the time.
Look out for apps on all devices that require an internet connection.
If possible turn off wifi on all other devices in the vicinity.
Attire & Grooming:
Please wear unpatterned clothing; solid and bright colors that contrast your background work best on camera.
Set yourself up so that you will not have to fidget throughout the class.
Tie back any hair that might cover your face or cause fidgeting.
Choose clothing and accessories that you won’t have to adjust while teaching.
Please note: Meditation and breathing classes may be filmed as a headshot (from the sternum up)
Set up your equipment:
Double check internet connection, battery life, lighting, and sound quality.
On your phone:
Go into your settings and make sure the resolution is set 1080p or higher.
Make sure you’re connected to wifi.
Exit out of applications that are not in use.
Use the camera on the back, not selfie mode.
Ensure there’s no dust on your camera lens.
On your laptop: Make sure all background programs that take up bandwidth are off. Disable audible system updates or notifications.
Put your phone on Do Not Disturb mode.
15-Minutes Before Class
Open the virtual meeting.
Complete the dual device setup.
Do a camera- and sound-check.
Meet-and-Greet
Try to start conversation, as per the general recommendations.
Invite students to use the chat box.
Explain how to set up their space; let them know to silence distractions and create a peaceful environment (light a candle?)
Let students know that you won’t be using any props, but if they have them, they are welcome to use them on their own (informal props like blankets, pillows, books, water bottles, etc. work too)
Gently and kindly encourage students to turn on their cameras, unless otherwise specified in the Session Details.
Share your name and the city that you’re teaching from.
Starting and Teaching Class
Keep the laptop view in gallery mode.
Note the number of meeting participants for your attendance count, and verify again ¾ of the way through the class. Subtract one for yourself.
Spotlight your video (click on the three dots in the top right of your screen and select “spotlight”).
Turn off your laptop’s video camera (when teaching in dual-device mode).
Mute participants. Let students know that if there’s any technical difficulties during class, they should unmute themselves and let you know.
View and teach to students while you demo from your mat.
If no students arrive, please record a session for on-demand use, as directed in your Session Details.
Employment Policies
Non-Solicitation
When ThriveHub assigns you to a corporate class, the business you serve is a ThriveHub Client.
All Client-related communication (scheduling, logistics, payment, etc.) must go through your ThriveHub Contact, unless otherwise specified.
If a Client or student requests additional wellness services, check with your ThriveHub Contact first before responding or proceeding.
Any unapproved solicitation of a ThriveHub Client or their students is a violation of your contractor agreement and may result in immediate termination and potential legal action.
Employment Status: At-Will Independent Contractor
ThriveHub teachers are at-will independent contractors. Either you or ThriveHub may end the relationship at any time, with or without cause, and with or without notice.
If you choose to end your work with ThriveHub, email your ThriveHub Contact with the date of your final class.
Phase 1: Audition
Submit your application; teaching samples are encouraged, and required for virtual-only instructors.
We prioritize teachers with strong communication skills and availability/teaching styles that match Client needs.
Phase 2: Teach
We’ll contact you by text or email with opportunities—please reply promptly, yes or no.
After each class, students receive a survey; we share feedback with you.
Teachers with consistently strong feedback receive more opportunities.
Workplace Policies
Please read and follow ThriveHub’s Workplace Discrimination and Anti-Harassment Policy.
If you know a great instructor, please refer teachers through our application link.
Bonuses
Bonus opportunities may be offered and will be specified before your class start date. Bonuses may be earned when:
A Client renews their package or subscription with your group
Student attendance increases over time
To increase your eligibility for bonuses:
Suggest improvements that may increase attendance or strengthen programs
Engage students before and after class
Learn and remember students’ names and personal details they choose to share
Offer helpful insights based on student interests
Foster curiosity and encourage students to keep practicing
Anticipate questions/concerns and address them proactively
Show up early, prepared, and enthusiastic
About ThriveHub
Vision
We are THE agency for wellness professionals.
ThriveHub is the go-to resource for individuals and organizations in every major city to find the highest quality professional wellness instructors.
We improve wellness standards.
We hire and train the best wellness professionals: the ones who awaken, inspire, and motivate students to practice daily. Our membership network empowers wellness instructors with the tools and support they need to grow, succeed, and lead.
We unite and elevate wellness practitioners worldwide, fostering growth and community across the globe.
Our Mission
Deliver transformative wellness experiences.
Grow a team of wellness experts.
Cultivate wellness communities.
Our Story
2013-2015: Founder and yoga teacher Ali Singer sparks the idea for ThriveHub (formerly YogaHub), and hosts meetups and small events.
2015: The company starts as a popup yoga studio in mixed-use space in Boston.
2016: We offer weekly wellness classes for guests at several hotels and expand our teacher team.
2017-2020: Corporate wellness offers extend to more hotels, offices, and apartments, and include wellness classes beyond yoga.
2020: COVID-19 pauses all onsite programs; we bring virtual wellness programs to remote teams and conferences.
2021 onward: YogaHub rebrands to ThriveHub, refines services, client niche, and teacher standards
What’s next? We are building an app that streamlines operations and enables us to better serve teachers, students, and clients. Our aim is for the technology to help us grow our network and further our mission.